管理公司帐户和许可证
Admin Panel Overview管理面板概述#
The company admin has the access to the Admin Panel available on the UNIGINE developer portal, that allows managing company accounts and licenses. To open the Admin Panel, do the following:公司管理员可以访问 UNIGINE 开发人员门户上提供的管理面板,允许管理公司帐户和许可证。要打开管理面板,请执行以下操作:
-
Go to developer.unigine.com and click the Sign In button in the top-right corner.转到 developer.unigine.com 并单击右上角的 Sign In 按钮。

-
On the page that opens, sign in using your credentials.在打开的页面上,使用您的凭据登录。
-
Select the My Company section.选择 My Company 部分。

On the Admin Panel, the following sections are available:在管理面板上,以下部分可用:
- Company info — provides the overall information on the total user amount, maximum upload capacity for the files uploaded to supplement support tickets.Company info — 提供有关总用户数量、上传文件的最大上传容量的总体信息,以补充支持票证。
- Edit company profile — allows adding such company information as website and phone or hiding it, if necessary.Edit company profile — 允许添加网站和电话等公司信息或在必要时隐藏它。
- Users — allows managing the company users: adding, deleting, editing, enabling, and disabling their profiles and modifying their roles.Users — 允许管理公司用户:添加、删除、编辑、启用和禁用他们的配置文件以及修改他们的角色。
- Manage files — the interface for managing the files uploaded to supplement support tickets.Manage files — 用于管理上传的文件以补充支持票的界面。
- Support tickets — displays all support tickets created by the company users, allows viewing and editing them.Support tickets — 显示公司用户创建的所有支持工单,允许查看和编辑它们。
- License Manager — the interface for managing licenses and allocated seats.License Manager — 管理许可证和分配席位的界面。
- Access control — allows controlling access to various products for various groups of users according to their roles.Access control — 允许根据用户的角色控制不同用户组对各种产品的访问。
Users用户#
This section allows managing the company users.此部分允许管理公司用户。
Creating a New User创建新用户#
To create a new user, click the Add new user button.要创建新用户,请单击 Add new user 按钮。

The form will open:表格将打开:
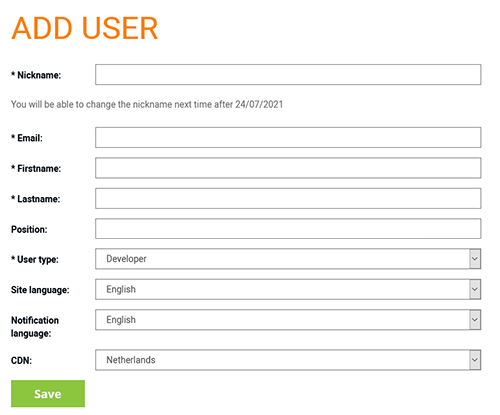
This form requires the following data to be filled in:此表格需要填写以下数据:
| Nickname | User nickname to be used on the UNIGINE forums. In can be changed on a semiannual basis only.在 UNIGINE 论坛上使用的用户昵称。 In 只能每半年更改一次。 |
|---|---|
| User email that is used for logging in to UNIGINE SDK Browser.用于登录的用户电子邮件UNIGINE SDK 浏览器. | |
| First name | The user's first name.用户的名字。 |
| Last name | The user's last name.用户的姓氏。 |
| Position | The user's position in the company. This field is optional.用户在公司中的地位。该字段是可选的。 |
| User type |
The role assigned to the user to regulate the access to SDKs and their materials. The following roles are available:分配给用户的角色来规范使用权SDK 及其材质。以下角色可用:
|
| Site language | The language in which the website is displayed by default. Users can switch the website language on their own.网站默认显示的语言。用户可以自行切换网站语言。 |
| Notification language | The language in which notifications are displayed.显示通知的语言。 |
| CDN | Content Delivery Network from which SDK will be downloaded.从中下载 SDK 的内容交付网络。 |
Managing Users管理用户#
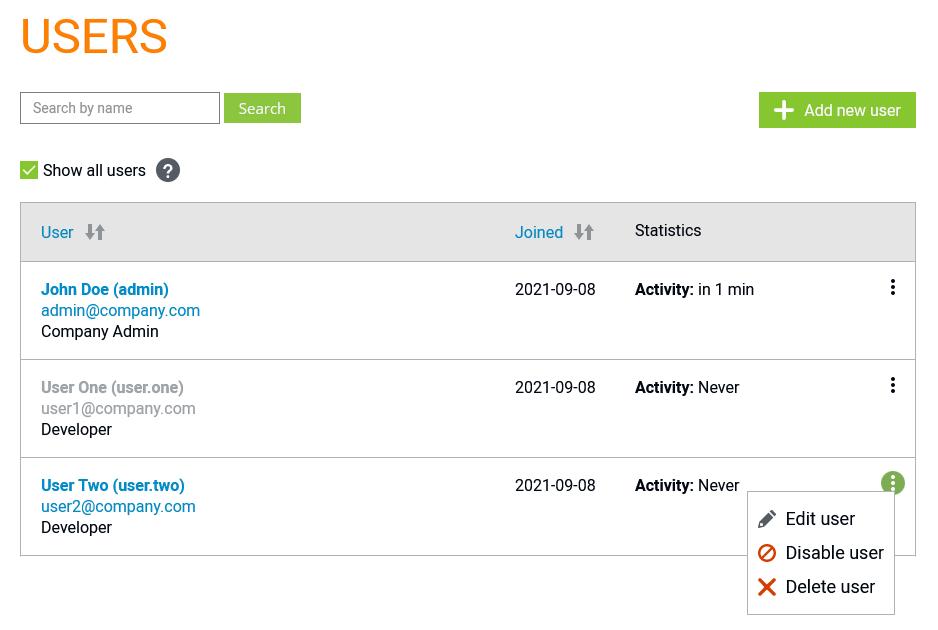
The Company Admin can manage the existing users as follows:公司管理员可以按如下方式管理现有用户:
 |
Open the form that has been used for the user creation to edit the data with the additional option of setting (generating) the password.打开已用于创建用户编辑数据的表单,表单包含设置(生成)密码的附加选项。 |
 |
Disable the user so that they won't be able to use the license, manage support tickets, or log in to UNIGINE SDK Browser.禁用用户,这样他们将无法使用许可证,管理支持票,或登录UNIGINE SDK 浏览器. |
 |
Enable the disabled users to let them act as set by their role. Information on the disabled users is colored grey. If the Show all users option above the list of users is disabled, such disabled users are not displayed in the list.启用被禁用的用户,让他按照其角色设置的方式进行操作。禁用用户的信息为灰色。如果用户列表上方的 Show all users 选项被禁用,则被禁用的用户将不再显示在列表中。 |
 |
Delete the user and all its data completely.完全删除用户及其所有数据。 |
License Manager许可证管理器#
The License Manager section contains the information on available licenses and the users who currently use these licenses and allows managing the license allocation.License Manager 部分包含有关可用许可证和当前使用这些许可证并允许管理许可证分配的用户的信息。
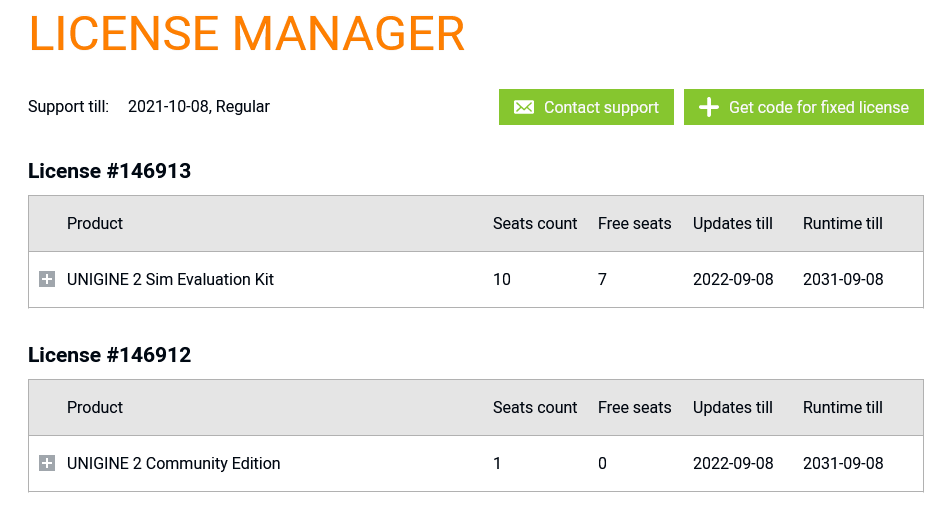
On the top of this section, there is the date until which support services are provided, the button for direct emailing via your email agent, and the button for receiving the code for the fixed offline activation.在这一节的顶部,有提供支持服务的日期,通过您的电子邮件代理直接发送电子邮件的按钮,以及 接收固定脱机激活代码的按钮。
The details on the license are viewed by clicking the  button on the left of the corresponding product (depending on the product some features may be unavailable):通过单击相应产品左侧的
  按钮可以查看许可证的详细信息 (取决于产品,某些功能可能不可用):
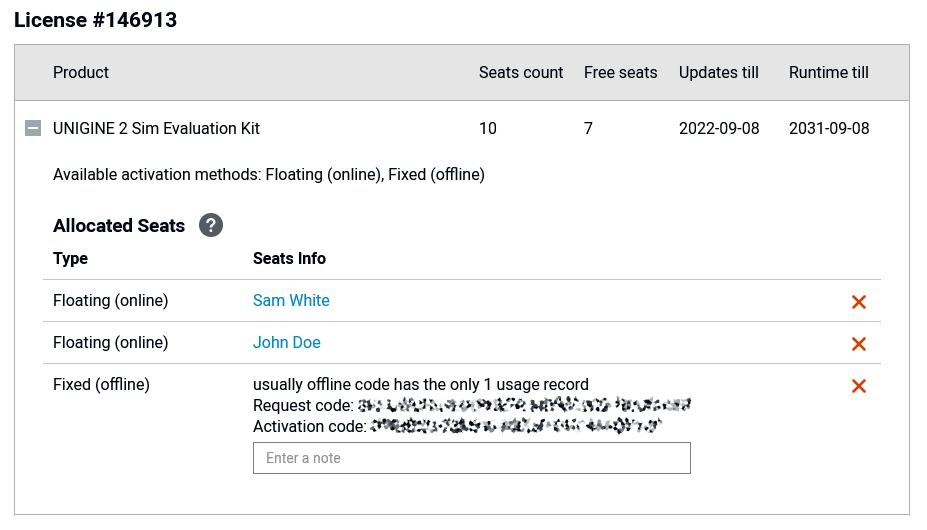
| Product | Name of the product for which the license is purchased.购买许可证的产品名称。 |
|---|---|
| Seats count | Number of seats available in total with the purchased license.数量座位可与购买的许可证一起使用。 |
| Free seats | Number of seats not assigned to any user.数量座位未分配给任何用户。 |
| Channels IG | Number of IG channels purchased (available for SIM Per Channel SDK).IG数量频道购买(适用于 SIM Per Channel SDK)。 |
| Channels VR | Number of VR channels purchased (available for SIM Per Channel SDK).虚拟现实数量频道购买(适用于 SIM Per Channel SDK)。 |
| Updates till | Expiration date of SDK updates.SDK 更新的到期日期。 |
| Runtime till | Expiration date of runtime.运行时的到期日期。 |
Allocated Seats分配的座位#
The Seat is a kind of workplace for a developer or an artist involved in project development. It can be taken by any member of the team at a certain moment, then released manually by the Admin via the Admin Panel and taken by another member.Seat 是参与项目开发的开发人员或艺术家的一种工作场所。它可以被团队的任何成员在某个时刻拿走,然后手动释放由行政通过管理面板并由其他成员获取。
Clicking the  button to the left of the product info displays the detailed information on allocated seats. Here you can see the number of free seats and available activation methods which depend on your license.单击产品信息左侧的
  图标可显示有关已分配座位的详细信息。在这里您可以看到免费席位的数量和可用的激活方法,具体取决于您的许可证。

The info on allocated seats is listed in the table with these parameters:表中列出了有关分配座位的信息,其中包含以下参数:
| Type | License activation type许可证激活类型 |
|---|---|
| Seats Info | Name of the user who has taken this seat. For the Offline license, you can also add a note about who (or which PC) this license is assigned to.坐过这个座位的用户名。对于脱机许可证,您还可以添加一个说明,说明将此许可证分配给谁(或哪台PC)。 |
Seat Deallocation座位回收#
To release the seat, click the  icon next to the corresponding allocated seat. This would allow disconnecting the license from the current user and making it available to another user.要释放座位,请单击相应已分配座位旁边的
  图标。这将允许从当前用户断开许可证并将其提供给另一个用户。
Generating Activation Code for Fixed License为固定许可证生成激活码#
To generate the activation code for the Fixed license that requires offline activation, it is required to have the request code generated on the PC where the SDK is going to run.为需要离线激活的Fixed许可证生成激活码,需要有请求代码在将要运行 SDK 的 PC 上生成。
-
In the License Manager section of the Admin Panel, click the Get code for fixed license button.在 License Manager 部分管理面板,单击 Get code for fixed license 按钮。

-
Paste or type in the request code obtained in Step 5, select the user you generate it for, write a note (optional), and click Get. The *.key text file with the activation code will be generated.粘贴或键入请求代码步骤 5 中获得,选择您为其生成密码的用户,写一个注释(如果需要),然后单击 Get。将生成带有激活码的 *.key 文本文件。
注意If the user changes the PC itself or some of the hardware components, a new activation code must be generated, and the seat should be reassigned.如果用户更改了 PC 本身或某些硬件组件,则必须生成新的激活码,并应重新分配座位。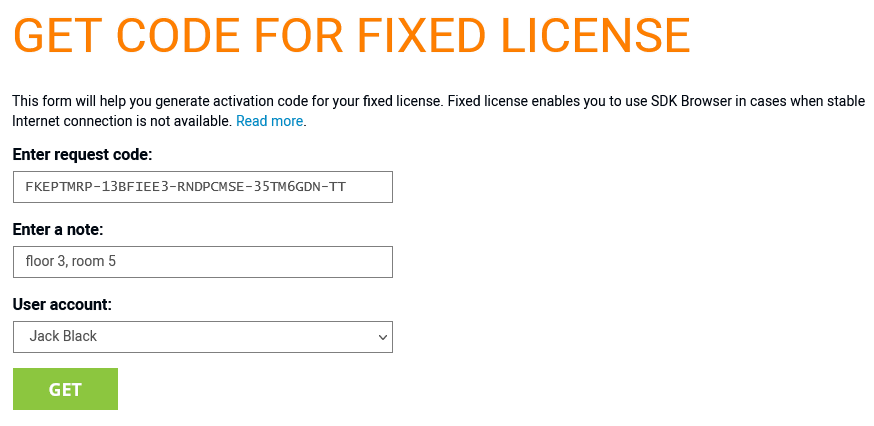
-
Copy the activation code to the clipboard or save it as a *.key text file on the local disk by clicking the corresponding link.将激活码复制到剪贴板或通过单击相应链接将其另存为本地磁盘上的 *.key 文本文件。
 注意Depending on your web browser settings, the file can be automatically saved in the folder used by the web browser to store downloaded files. Usually, it is the Downloads folder.根据您的网络浏览器设置,文件可以自动保存在网络浏览器用来存储下载文件的文件夹中。通常,它是 Downloads 文件夹。
 - Provide the activation code to the PC where the SDK that needs to be activated is installed in order to complete activation (Steps 7-9). 向安装了需要激活的SDK的PC提供激活码,以完成激活(步骤 7-9 )。
Access Control访问控制#
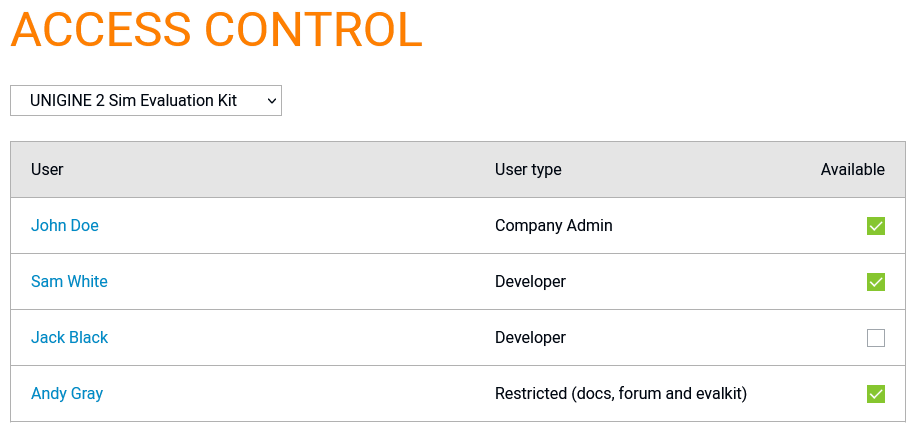
The Access Control section allows additionally manage the access of various types of users to each of the available products.Access Control 部分允许额外管理各种访问用户类型到每个可用的产品。
The dropdown on the top contains the list of available products. You can switch between them to check the access of each user to every product.顶部的下拉菜单包含可用产品的列表。您可以在它们之间切换,以检查每个用户对每个产品的访问。
The checkbox on the right allows enabling and disabling the user access to every product.右边的复选框允许启用和禁用用户对每个产品的访问。
