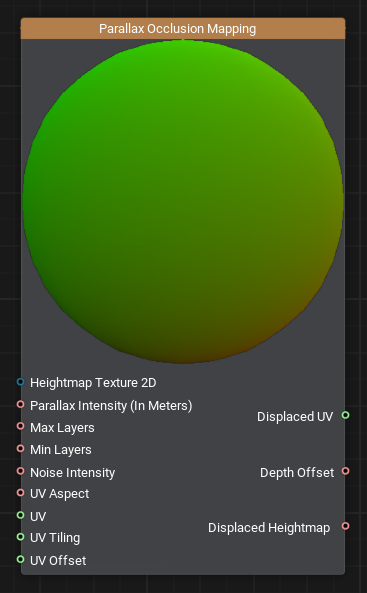
Parallax Occlusion Mapping Node
Description
This node enhances realism of 3D surfaces by creating the illusion of depth through parallax effect. This technique simulates complex surface details without increasing geometric complexity, resulting in more immersive visual experiences.
Use Cases
- Enhancing Surface Detail: Ideal for simulating elaborate surface features like bricks, stones, or wood grains, providing a 3D appearance on flat models.
- Optimizing Performance: Offers a balance between visual fidelity and performance by reducing the need for additional geometry.
Functionality
The Parallax Occlusion Mapping node adjusts texture coordinates (UVs) to incorporate parallax effects based on the heightmap. By displacing UVs according to the viewer's perspective and the heightmap data, it creates a visual effect where surface details appear to have depth and self-occlusion. This method significantly enhances the perception of depth on flat surfaces.
Usage Examples
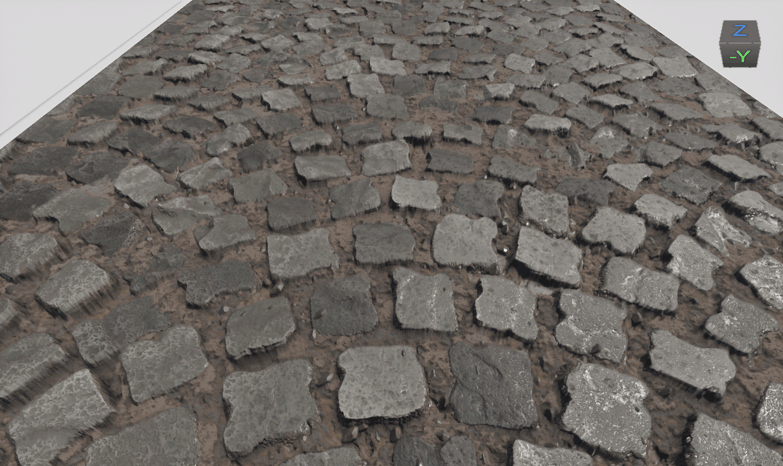
Creating A Cobblestone Pathway
- Create a new Material Graph and ensure it is assigned to your mesh.
- Add a Parallax Occlusion Mapping node, connect a Heightmap Texture to the Heightmap Texture 2D input of the Parallax Occlusion Mapping node.
-
Add three Slider nodes and connect them to the Parallax Occlusion Mapping node:
- Parallax Intensity
- Max Layers
- Min Layers
Adjust the UV Aspect, UV Tiling, and UV Offset if needed, to align the effect properly with the mesh.
- Add a Texture2D node and connect it to a Sample Texture node.
- Connect the Displaced UV output of the Parallax Occlusion Mapping node to the UV input of the Sample Texture node.
- Repeat this process for the Normal Map.
By following these steps, you will have a cobblestone material creating a convincing illusion of depth. This setup avoids costly geometry detailing while still achieving a highly detailed surface.
Ports
| Name | Description | |
|---|---|---|
 | Heightmap Texture 2D | Heightmap texture, where R channel stores concavity values. Black - maximum concavity, white - maximum convexity (no parallax effect is applied). |
 | Parallax Intensity | Defines the depth of the parallax effect (in meters). The displacement of the surface is determined by the heightmap's texel values -
black areas (value 0) apply the full displacement, while brighter texels (approaching white) gradually reduce the effect.
|
| | Max Layers | Sets the number of parallax layers, when we look at the surface at a steep angle. Higher values increase quality but reduce performance. |
| | Min Layers | Sets the number of parallax layers, when we look at the surface orthogonally. Higher values increase quality but reduce performance. |
| | Noise Intensity | Controls noise intensity to blend parallax layers smoothly, reducing stair-step artifacts (terrace effect). |
| | UV Aspect | Maintains the correct texture aspect ratio. Should be equal to 1, for a square texture. |
 | UV | UV to which the parallax effect is applied. |
| | UV Tiling | Tiling of the texture. Controls the repetition scale of the texture across the surface. |
| | UV Offset | Offset for UV coordinates. Adjusts the starting point of the texture on the surface. |
| | Displaced UV | Parallaxed UVs for textures. The modified UV coordinates after applying the parallax effect. |
| | Depth Offset | Provides the offset (displacement) depth value. |
| | Displaced Heightmap | Heightmap value displaced because of parallax effect. |
The information on this page is valid for UNIGINE 2.20 SDK.