Использование компонентной системы C++
 The C++ Component System enables you to implement your application's logic via a set of building blocks - components, and assign these blocks to nodes. A logic component integrates a node, a property, and a C++ class containing logic implementation.Компонентная система C++ позволяет реализовать логику вашего приложения с помощью набора строительных блоков - компонентов и назначить эти блоки на ноды. Логический компонент объединяет ноду, свойство и класс C++, содержащий логическую реализацию.
This example demonstrates how to:Этот пример демонстрирует, как:
- Decompose application logic into building blocks.разложить логику приложения на составные блоки;
- Create your own logic components.создать свои собственные логические компоненты;
- Implement interaction between your components.реализовать взаимодействие между компонентами.
Let's make a simple game to demonstrate how the whole system works.Давайте создадим простую игру, чтобы продемонстрировать, как работает вся система в целом.
See AlsoСмотрите также#
This case is also provided as an SDK sample.Этот случай также представлен в виде примера в SDK.
Game DescriptionОписание игры#
In the center of the play area, we are going to have an object (Pawn) controlled by the player via the keyboard. It has certain amount of HP and movement parameters (movement and rotation speed).В центре игрового поля у нас будет объект (Pawn), которым игрок будет управлять с помощью клавиатуры. У него есть определенное количество здоровья и параметры передвижения (скорость перемещения и вращения).
Four corners of the play area are occupied by rotating objects (Spinner) that throw other small objects (Projectile) in all directions while rotating.Четыре угла игровой площадки заняты вращающимися объектами (Spinner), которые при вращении разбрасывают другие мелкие объекты (Projectile) во все стороны.
Each Projectile moves along a straight line in the directon it has been initially thrown by the Spinner. If a Projectile hits a Pawn, the latter takes damage according to the value set for the hitting Projectile (each of them has a random speed and damage value). The pawn is destroyed if the amount of HP drops below zero.Каждый Projectile движется по прямой линии в том направлении, в котором его первоначально бросил Spinner. Если Projectile попадает в Pawn, то Pawn получает урон в соответствии со значением, установленным для Projectile, который в него попал (у каждого из них есть произвольная скорость и значение урона). Pawn уничтожается, если количество здоровья будет ниже нуля.
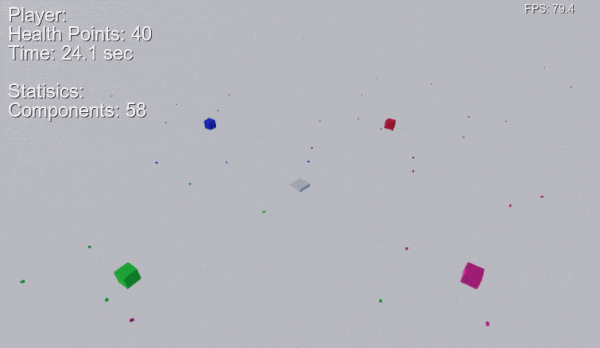
We use boxes for simplicity, but you can easily replace them with any other objects.Мы используем кубики для простоты, но вы можете легко заменить их любыми другими предметами.
The basic workflow for implementing application logic using the C++ Component System is given below.Ниже приведен базовый рабочий процесс для реализации логики приложения с использованием Компонентной системы C++.
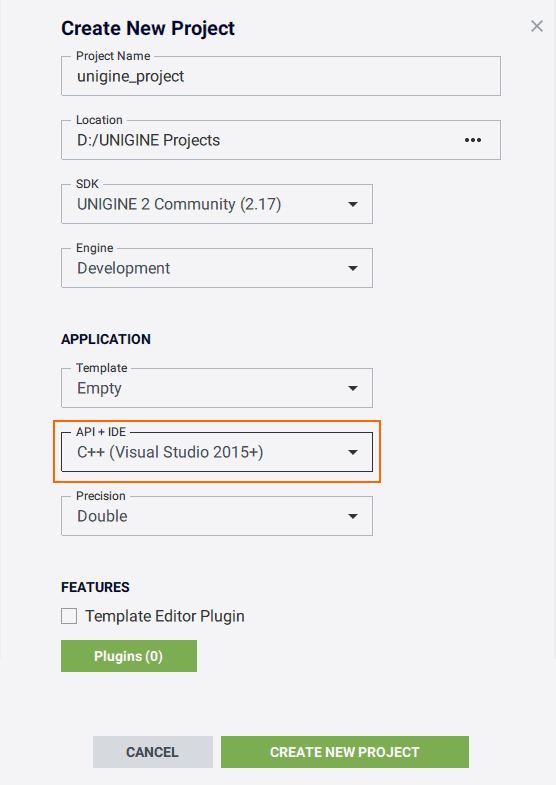
1. Prepare a Project1. Подготовка проекта#
Before we can start creating components and implementing our game logic, we should create a new C++ project.Прежде чем приступить к созданию компонентов и реализации нашей игровой логики, нам нужно создать новый проект на C++.
2. Decompose Application Logic into Building Blocks2. Декомпозиция логики приложения на отдельные блоки#
First of all, we should decompose our application logic in terms of building blocks - components. So, we should define parameters for each component (all these parameters will be stored in a corresponding *.prop file) and decide in which functions of the execution sequence the component's logic will be implemented.Прежде всего, мы должны разложить логику нашего приложения на составные блоки - компоненты. Поэтому нужно определить параметры для каждого компонента (все эти параметры будут сохранены в соответствующем файле *.prop) и решить, в каких функциях последовательности выполнения будет реализована логика компонента.
For our small game, we are going to use one component for each type of object. Thus, we need 3 components:Для нашей небольшой игры мы будем использовать по одному компоненту для каждого типа объектов. Таким образом, нам понадобятся 3 компонента:
-
Pawn with the following parameters:Pawn со следующими параметрами:
- name - name of the Pawnname - имя ноды Pawn
- moving speed - how fast the Pawn movesmoving speed - скорость перемещения Pawn
- rotation speed - how fast the Pawn rotatesrotation speed - скорость вращения Pawn
- health - HP count for the Pawnhealth - количество очков здоровья Pawn
We are going to initialize the Pawn, do something with it each frame, and report a message, when the Pawn dies. Therefore, this logic will be implemented inside the init(), update(), and shutdown() methods.Мы собираемся инициализировать Pawn, что-то делать с ней в каждом кадре и отправлять сообщение, когда Pawn умирает. То есть нам нужно будет реализовать логику внутри методов init(), update() и shutdown(). -
Spinner with the following parameters:Spinner со следующими параметрами:
- rotation speed - how fast the Spinner rotatesrotation speed - скорость вращения ноды Spinner
- acceleration - how fast Spinner's rotation rate increasesacceleration - насколько быстро увеличивается скорость вращения Spinner
- node to be used as a projectileнода, которая будет использоваться в качестве Projectile
- minimum spawn delayминимальная задержка появления
- maximum spawn delayмаксимальная задержка появления
We are going to initialize a Spinner and do something with it each frame. Therefore, this logic will go to the init() and update().Мы собираемся инициализировать Spinner и что-то делать с ним в каждом кадре. То есть будем добавлять логику в init() и update(). - Projectile with the following parameters:Projectile со следующими параметрами:
- speed - how fast the Projectile movesspeed - скорость перемещения Projectile
- lifetime - how long the Projectile liveslifetime - как долго существует Projectile
- damage - how much damage the Projectile causes to the Pawn it hitsdamage - какой урон Projectile наносит ноде Pawn, в которую он попадает
As for the projectile, it will be spawned and initialized by the Spinner. The only thing we are going to do with it, is checking for a hit and controlling the life time left every frame. All of this goes to update().Что касается Projectile, то он будет создан и инициализирован счетчиком. Единственное, что мы собираемся с ним делать, это проверять попадание и контролировать оставшееся время жизни в каждом кадре. Все это происходит в update().
3. Create a C++ Class for Each Component3. Создание C++ класса для каждого компонента#
For each of our components, we should derive a new C++ class from the ComponentBase class. Therefore, we should do the following in the header file:Для каждого из наших компонентов мы должны создать новый класс C++ из класса ComponentBase. Поэтому в заголовочном файле мы должны сделать следующее:
-
Declare a component class. The name of the class is used as the name of the property (the corresponding *.prop file is automatically saved in your project's data folder).Объявить класс компонента. Имя класса используется в качестве имени свойства (соответствующий файл *.prop автоматически сохраняется в папке data вашего проекта).
To declare a class, use the following:Для объявления класса используется следующее:Исходный код (C++)
COMPONENT_DEFINE(my_property_name, Unigine::ComponentBase); -
Declare all parameters defined above with their default values (if any).Объявить все параметры, определенные выше, с их значениями по умолчанию (если таковые имеются).To declare a parameter we can use the following macros (optional parameters are enclosed in square brackets []):Для объявления параметра мы можем использовать следующие макросы (необязательные параметры заключены в квадратные скобки []):Исходный код (C++)
PROP_PARAM(type, name[, default_value, title, tooltip, group]); PROP_STRUCT(type, name); PROP_ARRAY(type, name); PROP_ARRAY_STRUCT(type, name); -
Declare which methods we are going to use to implement our logic, and during which stages of the execution sequence to call them:Объявить методы, которые мы собираемся использовать для реализации логики, и указать, на каких этапах последовательности выполнения их вызывать:Исходный код (C++)
public: COMPONENT_INIT(my_init); COMPONENT_UPDATE(my_update); COMPONENT_SHUTDOWN(my_shutdown); // ... protected: void my_init(); void my_update(); void my_shutdown(); - Declare all necessary auxiliary parameters and functions.Объявить все необходимые вспомогательные параметры и функции.
Thus, for our Pawn, Spinner, and Projectile classes, we will have the following declarations:Таким образом, для классов Pawn, Spinner и Projectile будут следующие объявления:
Pawn.h
#pragma once
#include <UnigineGame.h>
#include <UnigineControls.h>

// include the header file of the Component System
#include <UnigineComponentSystem.h>

using namespace Unigine;
using namespace Math;

// derive our class from the ComponentBase
class Pawn : public ComponentBase
{
public:
	// declare constructor and destructor for our class and define a property name. The Pawn.prop file containing all parameters listed below will be saved in your project's data folder
	COMPONENT_DEFINE(Pawn, ComponentBase)
		// declare methods to be called at the corresponding stages of the execution sequence
		COMPONENT_INIT(init);
	COMPONENT_UPDATE(update);
	COMPONENT_SHUTDOWN(shutdown);

	// parameters
	PROP_PARAM(String, name, "Pawn1");		// Pawn's name
	PROP_PARAM(Int, health, 200);			// health points
	PROP_PARAM(Float, move_speed, 4.0f);	// move speed (meters/s)
	PROP_PARAM(Float, turn_speed, 90.0f);	// turn speed (deg/s)

	// methods
	void hit(int damage);	// decrease Pawn's HP

protected:
	// world main loop overrides
	void init();
	void update();
	void shutdown();

private:
	// auxiliary parameters and functions
	ControlsPtr controls;
	PlayerPtr player;

	float damage_effect_timer = 0;
	Mat4 default_model_view;

	void show_damage_effect();
};
Spinner.h
#pragma once
#include <UnigineMaterial.h>
#include <UnigineComponentSystem.h>

using namespace Unigine;
using namespace Math;

class Spinner : public ComponentBase
{
public:
	// declare constructor and destructor for the Spinner class
	COMPONENT_DEFINE(Spinner, ComponentBase);

	// declare methods to be called at the corresponding stages of the execution sequence
	COMPONENT_INIT(init);
	COMPONENT_UPDATE(update);

	// parameters
	PROP_PARAM(Float, turn_speed, 30.0f);
	PROP_PARAM(Float, acceleration, 5.0f);

	PROP_PARAM(Node, spawn_node);
	PROP_PARAM(Float, min_spawn_delay, 1.0f);
	PROP_PARAM(Float, max_spawn_delay, 4.0f);

protected:
	// world main loop
	void init();
	void update();

private:
	float start_turn_speed = 0;
	float color_offset = 0;
	float time_to_spawn = 0;
	MaterialPtr material;

	// converter from HSV to RGB color model
	vec3 hsv2rgb(float h, float s, float v);
};
Projectile.h
#pragma once
#include <UnigineMaterial.h>
#include <UnigineComponentSystem.h>

using namespace Unigine;

class Projectile : public ComponentBase
{
public:
	// declare constructor and destructor for the Projectile class
	COMPONENT(Projectile, ComponentBase);

	// declare methods to be called at the corresponding stages of the execution sequence
	COMPONENT_UPDATE(update);
	PROP_NAME("Projectile");

	// parameters
	PROP_PARAM(Float, speed, 5.0f);
	PROP_PARAM(Float, lifetime, 5.0f);	// life time of the projectile (declaration with a default value)
	PROP_PARAM(Int, damage);			// damage caused by the projectile (declaration with no default value)

	// methods
	void setMaterial(const MaterialPtr &mat);

protected:
	// world main loop
	void update();
};
4. Implement Each Component's Logic4. Реализация логики каждого компонента#
After making necessary declarations, we should implement logic for all our components. Let's do it in the corresponding *.cpp files.После всех необходимых объявлений мы должны реализовать логику для всех наших компонентов. Давайте сделаем это в соответствующих файлах *.cpp.
In each of these files, we should add the following macro to ensure automatic registration of the corresponding component by the Component System: В каждый из этих файлов мы должны добавить следующий макрос, чтобы обеспечить автоматическую регистрацию соответствующего компонента Компонентной системой:
REGISTER_COMPONENT ( your_component_name );Pawn's LogicЛогика Pawn#
The Pawn's logic is divided into the following elements:Логика Pawn делится на следующие элементы:
-
Initialization - here we set necessary parameters, and the Pawn reports its name: Инициализация - здесь мы задаем необходимые параметры, и Pawn сообщает свое имя:Исходный код (C++)
Log::message("PAWN: INIT \"%s\"\n", name.get());ПримечаниеYou can access parameters of your component via: <parameter_name>.get()Вы можете получить доступ к параметрам вашего компонента с помощью <parameter_name>.get() -
Main loop - here we implement the player's keyboard control. Основной цикл - здесь мы реализуем управление с клавиатуры.ПримечаниеTo access the node from the component, we can simply use node, e.g. to get the current node's direction we can write:Чтобы получить доступ к ноде из компонента, мы можем просто использовать node, например, чтобы получить направление текущей ноды, можно написать:Исходный код (C++)
Vec3 direction = node->getWorldTransform().getColumn3(1); - Shutdown - here we implement actions to be performed when a Pawn dies. We'll just print a message to the console. Завершение работы - здесь мы реализуем действия, которые будут выполняться, когда Pawn умрет. Мы просто выведем сообщение на консоль.
- Auxiliary - a method to be called when the pawn is hit, and some visual effects. Вспомогательный - метод, вызываемый при ударе Pawn, и некоторые визуальные эффекты.
Implementation of the Pawn's logic is given below:Ниже приведена реализация логики Pawn:
Pawn.cpp
#include "Pawn.h"
#include <UnigineConsole.h>
#include <UnigineRender.h>
REGISTER_COMPONENT(Pawn);		// macro for component registration by the Component System
#define DAMAGE_EFFECT_TIME 0.5f

void Pawn::init()
{
	player = Game::getPlayer();
	controls = player->getControls();

	default_model_view = player->getCamera()->getModelview();
	damage_effect_timer = 0;
	show_damage_effect();

	Log::message("PAWN: INIT \"%s\"\n", name.get());
}

void Pawn::update()
{
	// get delta time between frames
	float ifps = Game::getIFps();

	// show damage effect
	if (damage_effect_timer > 0)
	{
		damage_effect_timer = Math::clamp(damage_effect_timer - ifps, 0.0f, DAMAGE_EFFECT_TIME);
		show_damage_effect();
	}

	// if console is opened we disable any controls
	if (Console::isActive())
		return;

	// get the direction vector of the mesh from the second column (y axis) of the transformation matrix
	Vec3 direction = node->getWorldTransform().getColumn3(1);

	// checking controls states and changing pawn position and rotation
	if (controls->getState(Controls::STATE_FORWARD) || controls->getState(Controls::STATE_TURN_UP))
	{
		node->setWorldPosition(node->getWorldPosition() + direction * move_speed * ifps);
	}

	if (controls->getState(Controls::STATE_BACKWARD) || controls->getState(Controls::STATE_TURN_DOWN))
	{
		node->setWorldPosition(node->getWorldPosition() - direction * move_speed * ifps);
	}

	if (controls->getState(Controls::STATE_MOVE_LEFT) || controls->getState(Controls::STATE_TURN_LEFT))
	{
		node->setWorldRotation(node->getWorldRotation() * quat(0.0f, 0.0f, turn_speed * ifps));
	}

	if (controls->getState(Controls::STATE_MOVE_RIGHT) || controls->getState(Controls::STATE_TURN_RIGHT))
	{
		node->setWorldRotation(node->getWorldRotation() * quat(0.0f, 0.0f, -turn_speed * ifps));
	}
}

void Pawn::shutdown()
{
	Log::message("PAWN: DEAD!\n");
}

// method to be called when the Pawn is hit by a Projectile
void Pawn::hit(int damage)
{
	// take damage
	health = health - damage;

	// show effect
	damage_effect_timer = DAMAGE_EFFECT_TIME;
	show_damage_effect();

	// destroy
	if (health <= 0)
		node.deleteLater();

	Log::message("PAWN: damage taken (%d) - HP left (%d)\n", damage, health.get());
}

// auxiliary method implementing visual damage effect
void Pawn::show_damage_effect()
{
	float strength = damage_effect_timer / DAMAGE_EFFECT_TIME;
	Render::setFadeColor(vec4(0.5f, 0, 0, saturate(strength - 0.5f)));
	player->getCamera()->setModelview(default_model_view * Mat4(
		rotateX(Game::getRandomFloat(-5, 5) * strength) *
		rotateY(Game::getRandomFloat(-5, 5) * strength)));
}
Projectile's LogicЛогика Projectile#
The Projectile's logic is simpler - we just have to perform a check each frame whether we hit the Pawn or not. This means that we have to access the Pawn component from the Projectile component.Логика работы с Projectile проще - нам просто нужно проверять каждый кадр, попадаем мы в Pawn или нет. Это означает, что мы должны получить доступ к компоненту Pawn из компонента Projectile.
To access certain component on a certain node (e.g. the one that was intersected in our case) we can write the following:Чтобы получить доступ к определенному компоненту на определенной ноде (например, в нашем случае к тому, с которым произошло пересечение), мы можем написать следующее:
// get the component assigned to a node by type "MyComponent"
MyComponent *my_component = getComponent<MyComponent>(some_node);

// access some method of MyComponent
my_component->someMyComponentMethod();
The Projectile has a limited life time, so we should destroy the node when its life time is expired.Срок службы Projectile ограничен, поэтому мы должны уничтожить ноду, когда срок ее существования истечет.
To destroy a node, to which a component is added, simply call: node.deleteLater(). The node will be destroyed with all its properties and components.Чтобы уничтожить ноду, на которую назначен компонент, просто вызовите node.deleteLater(). Нода будет уничтожена со всеми ее свойствами и компонентами.Implementation of the Projectile's logic is given below:Ниже приведена реализация логики работы Projectile:
Projectile.cppProjectile.cpp
#include "Projectile.h"
#include "Pawn.h"
#include "Spinner.h"
#include <UnigineGame.h>
#include <UnigineWorld.h>

REGISTER_COMPONENT(Projectile);		// macro for component registration by the Component System

void Projectile::update()
{
	// get delta time between frames
	float ifps = Game::getIFps();

	// get the direction vector of the mesh from the second column (y axis) of the transformation matrix
	Vec3 direction = node->getWorldTransform().getColumn3(1);

	// move forward
	node->setWorldPosition(node->getWorldPosition() + direction * speed * ifps);

	// lifetime
	lifetime = lifetime - ifps;
	if (lifetime < 0)
	{
		// destroy current node with its properties and components

		node.deleteLater();
		return;
	}

	// check the intersection with nodes
	VectorStack<NodePtr> nodes; // VectorStack is much faster than Vector, but has some limits
	World::getIntersection(node->getWorldBoundBox(), nodes);
	if (nodes.size() > 1) // (because the current node is also in this list)
	{
		for (int i = 0; i < nodes.size(); i++)
		{
			Pawn *pawn = getComponent<Pawn>(nodes[i]);
			if (pawn)
			{
				// hit the player!
				pawn->hit(damage);

				// ...and destroy current node

				node.deleteLater();
				return;
			}
		}
	}
}

void Projectile::setMaterial(const MaterialPtr &mat)
{
	checked_ptr_cast<Object>(node)->setMaterial(mat, "*");
}
Spinner's LogicЛогика Spinner#
The Spinner's logic is divided into the following elements:Логика работы Spinner состоит из следующих элементов:
- Initialization - here we set necessary parameters to be used in the main loop. Инициализация - здесь мы задаем необходимые параметры, которые будут использоваться в основном цикле.
-
Main loop - here we rotate our Spinner and spawn nodes with Projectile components. We also set some parameters of the Projectile. Основной цикл - здесь мы вращаем наш Spinner и создаем ноды с компонентами Projectile. Мы также задаем некоторые параметры Projectile.There are 3 ways to change variables of another component:Существует 3 способа изменить переменные другого компонента:
-
Directly via component (fast, easy)Непосредственно через компонент (быстро и просто)Исходный код (C++)
component->int_parameter = component->int_parameter + 1; -
Via node's property (slower, more awkward)Через свойство ноды (медленнее, неудобнее)Исходный код (C++)
for (int i = 0; i < node->getNumProperties(); i++) { PropertyPtr prop = node->getProperty(i); if (prop && (!strcmp(prop->getName(), "my_prop_name") || prop->isParent("my_prop_name"))) prop->setParameterInt(prop->findParameter("int_parameter"), 5); } -
Via component's propertyЧерез свойство компонентаИсходный код (C++)
PropertyPtr prop = component->getProperty();
prop->setParameterInt(prop->findParameter("int_parameter"), 5);
-
- Auxiliary - color conversion function. Вспомогательный - функция преобразования цвета.
Implementation of the Spinner's logic is given below:Ниже приведена реализация логики работы Spinner:
Spinner.cpp
#include "Spinner.h"
#include "Projectile.h"
#include <UnigineGame.h>
#include <UnigineEditor.h>

REGISTER_COMPONENT(Spinner);		// macro for component registration by the Component System

void Spinner::init()
{
	// get current material (from the first surface)
	ObjectPtr obj = checked_ptr_cast<Object>(node);

	if (obj && obj->getNumSurfaces())
		material = obj->getMaterialInherit(0);

	// init randoms
	time_to_spawn = Game::getRandomFloat(min_spawn_delay, max_spawn_delay);
	color_offset = Game::getRandomFloat(0, 360.0f);
	start_turn_speed = turn_speed;
}

void Spinner::update()
{
	// rotate spinner
	float ifps = Game::getIFps();
	turn_speed = turn_speed + acceleration * ifps;
	node->setRotation(node->getRotation() * quat(0, 0, turn_speed * ifps));

	// change color
	int id = material->findParameter("albedo_color");
	if (id != -1)
	{
		float hue = Math::mod(Game::getTime() * 60.0f + color_offset, 360.0f);
		material->setParameterFloat4(id, vec4(hsv2rgb(hue, 1, 1), 1.0f));
	}

	// spawn projectiles
	time_to_spawn -= ifps;
	if (time_to_spawn < 0 && spawn_node)
	{
		// reset timer and increase difficulty
		time_to_spawn = Game::getRandomFloat(min_spawn_delay, max_spawn_delay) / (turn_speed / start_turn_speed);

		// create node
		NodePtr spawned = spawn_node->clone();
		spawned->setEnabled(1);
		spawned->setWorldTransform(node->getWorldTransform());

		// don't destroy it on quitting the current scope
		// note: if you plan to add some components to this object
		// you have to use release() method and transfer ownership of this
		// object to the Editor

		// create component
		Projectile *proj_component = addComponent<Projectile>(spawned);

		// there are three ways to change variables inside another component:
		// 1) direct change via component (fast, easy)
		proj_component->speed = Game::getRandomFloat(proj_component->speed * 0.5f, proj_component->speed * 1.5f);

		// 2) change via property of the node (more slow, more awkward)
		for (int i = 0; i < spawned->getNumProperties(); i++)
		{
			PropertyPtr prop = spawned->getProperty(i);
			if (prop && (!strcmp(prop->getName(), "Projectile") || prop->isParent("Projectile")))
				prop->getParameterPtr("damage")->setValueInt(Game::getRandomInt(75, 100));
		}

		// 3) change via property of the component
		PropertyPtr proj_property = proj_component->getProperty();
		proj_property->getParameterPtr("lifetime")->setValueFloat(Game::getRandomFloat(5.0f, 10.0f));

		// call public method of another component
		proj_component->setMaterial(material);
	}
}

// color conversion H - [0, 360), S,V - [0, 1]
vec3 Spinner::hsv2rgb(float h, float s, float v)
{
	float p, q, t, fract;

	h /= 60.0f;
	fract = h - Math::floor(h);

	p = v * (1.0f - s);
	q = v * (1.0f - s * fract);
	t = v * (1.0f - s * (1.0f - fract));

	if (0.0f <= h && h < 1.0f) return vec3(v, t, p);
	else if (1.0f <= h && h < 2.0f) return vec3(q, v, p);
	else if (2.0f <= h && h < 3.0f) return vec3(p, v, t);
	else if (3.0f <= h && h < 4.0f) return vec3(p, q, v);
	else if (4.0f <= h && h < 5.0f) return vec3(t, p, v);
	else if (5.0f <= h && h < 6.0f) return vec3(v, p, q);
	else return vec3(0, 0, 0);
}
5. Register Components in the Component System5. Регистрация компонентов в Компонентной системе#
Now we have all our game logic implemented in the corresponding components: Pawn, Spinner, and Projectile. There is one more thing to be done before we can start using them. We should register our components in the Component System.Теперь вся наша игровая логика реализована в соответствующих компонентах: Pawn, Spinner и Projectile. Есть еще одна вещь, которую необходимо сделать, прежде чем мы сможем начать их использовать. Мы должны зарегистрировать наши компоненты в Компонентной системе.
All components having the REGISTER_COMPONENT macro declared in their implementation files (*.cpp), are registered automatically by the Component System upon its initialization, just add a single line to the AppSystemLogic::init() method:Все компоненты, имеющие макрос REGISTER_COMPONENT, объявленный в их файлах реализации (*.cpp), автоматически регистрируются Компонентной системой при инициализации, просто добавьте одну строку в метод AppSystemLogic::init():
#include <UnigineComponentSystem.h>

/* ... */

int AppSystemLogic::init()
{
	/* ... */

	// initialize ComponentSystem and register all components
	Unigine::ComponentSystem::get()->initialize();

	/* ... */
}
Voila! All our components are registered at once!Вуаля! Все наши компоненты сразу же зарегистрированы!
6. Add Components to Nodes6. Добавление компонентов к нодам#
As we implemented our game logic in the components and registered them in the System, we can actually start using them. There are two ways to add a logic component to a node:После того как мы внедрили нашу игровую логику в компоненты и зарегистрировали их в системе, мы можем начать их использовать. Есть два способа назначить логический компонент на ноду:
-
By simply assigning the corresponding property to it via UnigineEditor or code:Просто присвоить ей соответствующее свойство с помощью UnigineEditor или кода:Исходный код (C++)
object1->addProperty("MyComponentProperty"); object2->setProperty(0, "MyComponentProperty"); -
By calling the corresponding method of the Component System:Вызвать соответствующий метод компонентной системы:Исходный код (C++)
ComponentSystem::get()->addComponent<MyComponent>(object);
Here is the resulting code for our game including registration of components as well as adding them to nodes:Вот итоговый код для нашей игры, включающий регистрацию компонентов, а также добавление их на ноды:
game.cpp
#include <UnigineEngine.h>
#include <UnigineLights.h>
#include <UnigineWidgets.h>

#include <UnigineComponentSystem.h>
#include "Spinner.h"
#include "Projectile.h"
#include "Pawn.h"

using namespace Unigine;
using namespace Math;
//////////////////////////////////////////////////////////////////////////
// System logic class
//////////////////////////////////////////////////////////////////////////

class AppSystemLogic : public SystemLogic
{
public:
	AppSystemLogic() {}
	virtual ~AppSystemLogic() {}
	virtual int init()
	{
		// initialize ComponentSystem and register all components
		Unigine::ComponentSystem::get()->initialize();

		// run in background
		Engine::get()->setBackgroundUpdate(Engine::BACKGROUND_UPDATE_RENDER_NON_MINIMIZED);

		// load world
		World::loadWorld("cs");

		return 1;
	}
};

//////////////////////////////////////////////////////////////////////////
// World logic class
//////////////////////////////////////////////////////////////////////////

class AppWorldLogic : public WorldLogic
{
public:
	AppWorldLogic() {}
	virtual ~AppWorldLogic() {}
	virtual int init()
	{
		// create static camera
		player = PlayerDummy::create();

		player->setPosition(Vec3(17.0f));
		player->setDirection(vec3(-1.0f), vec3(0.0f, 0.0f, 1.0f));
		Game::setPlayer(player);

		// create light
		sun = LightWorld::create(vec4_one);

		sun->setName("Sun");
		sun->setWorldRotation(Math::quat(45.0f, 30.0f, 300.0f));

		// Note: objects are added to the world when created

		// create objects
		ObjectMeshDynamicPtr obj[4];
		obj[0] = create_box(translate(Vec3(-16.0f, 0.0f, 0.0f)), vec3(1.0f));
		obj[1] = create_box(translate(Vec3(16.0f, 0.0f, 0.0f)), vec3(1.0f));
		obj[2] = create_box(translate(Vec3(0.0f, -16.0f, 0.0f)), vec3(1.0f));
		obj[3] = create_box(translate(Vec3(0.0f, 16.0f, 0.0f)), vec3(1.0f));

		// there are two ways to create components on nodes:
		// 1) via component system
		ComponentSystem::get()->addComponent<Spinner>(obj[0]);
		ComponentSystem::get()->addComponent<Spinner>(obj[1]);

		// 2) via property
		obj[2]->addProperty("Spinner");
		obj[3]->setProperty(0, "Spinner");

		// set up spinners (set "spawn_node" variable)
		ObjectMeshDynamicPtr projectile_obj = create_box(Mat4_identity, vec3(0.15f));
		projectile_obj->setEnabled(0);
		for (int i = 0; i < 4; i++)
			ComponentSystem::get()->getComponent<Spinner>(obj[i])->spawn_node = projectile_obj;

		// create player
		ObjectMeshDynamicPtr my_pawn_object = create_box(translate(Vec3(1.0f, 1.0f, 0.0f)), vec3(1.3f, 1.3f, 0.3f));
		my_pawn = ComponentSystem::get()->addComponent<Pawn>(my_pawn_object);
		my_pawn->setDestroyCallback(MakeCallback(this, &AppWorldLogic::my_pawn_destroyed));
		time = 0;

		// create info label
		label = WidgetLabel::create(Gui::getCurrent());
		label->setPosition(10, 10);
		label->setFontSize(24);
		label->setFontOutline(1);
		Gui::getCurrent()->addChild(label, Gui::ALIGN_OVERLAP);

		return 1;
	}

	virtual int update()
	{
		// increase time while player is alive
		if (my_pawn)
			time += Game::getIFps();

		// show game info
		label->setText(String::format(
			"Player:\n"
			"Health Points: %d\n"
			"Time: %.1f sec\n"
			"\n"
			"Statisics:\n"
			"Components: %d",
			(my_pawn ? my_pawn->health.get() : 0),
			time,
			ComponentSystem::get()->getNumComponents()).get());

		return 1;
	}

private:
	Pawn* my_pawn{ nullptr };	// Pawn player
	float time = 0;
	WidgetLabelPtr label;
	PlayerDummyPtr player;
	LightWorldPtr sun;

	void my_pawn_destroyed()
	{
		my_pawn = nullptr;
	}
	// method creating a box
	ObjectMeshDynamicPtr create_box(const Mat4 &transform, const vec3 &size)
	{
		MeshPtr mesh = Mesh::create();
		mesh->addBoxSurface("box", size);

		ObjectMeshDynamicPtr object = ObjectMeshDynamic::create(1);
		object->setMesh(mesh);
		object->setWorldTransform(transform);

		return object;
	}
};

//////////////////////////////////////////////////////////////////////////
// Main
//////////////////////////////////////////////////////////////////////////

int main(int argc, char **argv)
{
	// init engine
	Unigine::Engine::InitParameters init_params;
	init_params.window_title = "UNIGINE Engine: Component System Usage Example (C++)";
	Unigine::EnginePtr engine(init_params, argc, argv);

	// enter main loop
	AppWorldLogic world_logic;
	AppSystemLogic system_logic;
	engine->main(&system_logic, &world_logic, NULL);

	return 0;
}
Информация, представленная на данной странице, актуальна для версии UNIGINE 2.18.1 SDK.