Свойства сущностей
Each time you add a new model representing an entity to the world you should assign all necessary properties and adjust their parameters to ensure proper integration into the simulation environment.Каждый раз, когда вы добавляете новую модель, представляющую сущность, в мир следует присвоить все необходимые свойства и настроить их параметры, чтобы обеспечить правильную интеграцию в среду моделирования.
Before you start configuring properties, check that all pivot axes for the model are set properly: Перед тем, как приступить к настройке свойств, убедитесь, что все оси вращения для модели установлены правильно :
- The main pivot for the aircraft model should be set close to its center, with X axis pointing to the right and Y axis pointing forward.Главный поворот модели самолета должен быть установлен близко к ее центру, при этом ось X направлена вправо, а ось Y - вперед.
- Horizontal parts should have their pivot axes oriented along the +X (left-to-right relative to the plane), while vertical ones — along the +Z (bottom-to-top). Initial rotation angles of parts do not matter, important is that they should be in neutral position: extended — for gears, and retracted — for flaps.Горизонтальные части должны иметь оси вращения, ориентированные по +X (слева направо относительно плоскости), а вертикальные - по +Z (снизу вверх). Начальные углы поворота деталей значения не имеют, важно, чтобы они были в нейтральном положении: выдвинутые - для шестерен и убранные - для закрылков.
Model SimplificationУпрощение модели#
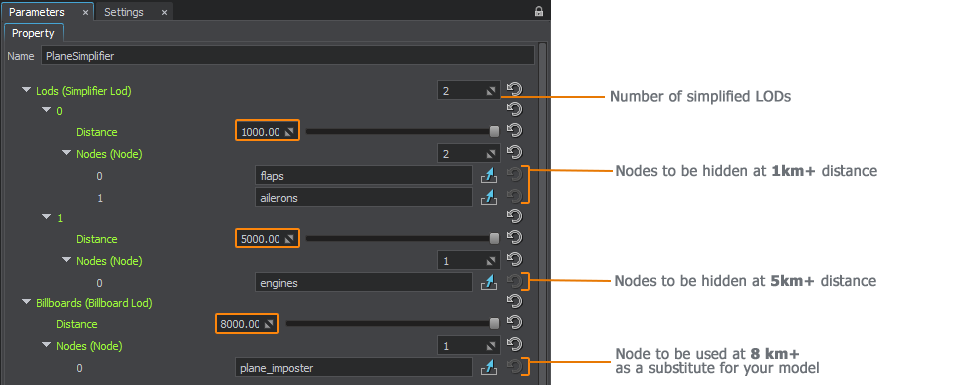
The Simplifier component can help optimize rendering of your entities. This component, when assigned to an entity, enables you to define which parts of its model can be neglected starting at certain distance levels (e.g., hide flaps, ailerons, and rudders at 1km, engines at 5 km, etc.) and which substitutes can be used to represent an entity at a large distance (e.g., a flashing strobe light, when the plane is just a point on the screen).Компонент Simplifier может помочь оптимизировать рендеринг ваших объектов. Этот компонент, когда он назначен объекту, позволяет вам определять, какими частями его модели можно пренебречь, начиная с определенных уровней расстояния (например, закрылки, элероны и рули направления на 1 км, двигатели на 5 км и т.д.), и какие заменители могут использоваться для представления объекта на большом расстоянии (например, мигающий стробоскоп, когда плоскость является лишь точкой на экране).
Basically there are 3 layers of LODs:В основном существует 3 уровня LOD:
- Surfaces Layer — UNIGINE's standard LOD SystemSurfaces Layer - стандартная Система уровней детализации (LOD) UNIGINE.
- Simplifier Nodes — when nodes change their enabled flag and detached from parentSimplifier Nodes - когда узлы меняют свой флаг enabled и отсоединяются от родительского
- Billboard Nodes — whole nodes become disabled (hidden) and only substituting billboards are shownBillboard Nodes - все узлы становятся отключенными (скрытыми) и отображаются только замещающие биллборды
To configure model simplification, assign a property inherited from the Simplifier to the node, and indicate which nodes are to be hidden at which distance, and when to substitute your model with an impostor:Чтобы настроить упрощение модели, присвойте узлу свойство, унаследованное от Simplifier, и укажите, какие узлы должны быть скрыты на каком расстоянии и когда заменять вашу модель биллбордом:

Surface LODs can be combined with Simplifier LODs:Уровни детализации поверхности можно комбинировать с уровнями детализации Simplifier:
- At a distance of 1000 and closer, flaps are represented by separate meshes.На расстоянии 1000 и ближе закрылки представлены отдельными мешами.
- If the plane is at a distance of 1000+, we can hide all flaps and enable a surface LOD for wings with flaps.Если самолет находится на расстоянии 1000+, мы можем скрыть все закрылки и включить LOD для крыльев с закрылками.
The last Billboard node replaces all model's geometry at a certain distance.Последний узел Billboard заменяет всю геометрию модели на определенном расстоянии.
The Simplifier component has its own distance scale value which enables quick tuning of the simplification process while balancing between quality and performance.Компонент Simplifier имеет собственное значение distance scale, которое позволяет быстро настроить процесс упрощения, сохраняя баланс между качеством и производительностью.
Prespawned EntitiesПредварительно создаваемые сущности#
You can create entities not only from code, but via UnigineEditor as well. This is achieved by assigning the EntityComponent property to an object. The entity in this case will already exist in the world, and all settings attributable to its type will be uploaded on the world load.Вы можете создавать сущности не только из кода, но и через UnigineEditor. Это достигается путем присвоения объекту свойства EntityComponent. В этом случае объект уже будет существовать в мире, и все настройки, относящиеся к его типу, будут загружены при загрузке мира.

WheelsКолеса#
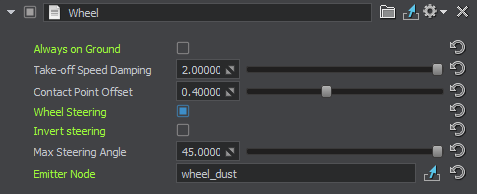
The Wheel property is intended for wheels or groups of wheels to fine-tune their behavior to make them look more natural:Свойство Wheel предназначено для колес или групп колес для точной настройки их поведения, чтобы они выглядели более естественно:

- Always on Ground — is used for optimization: if the vehicle is not intended to fly, it doesn't require any ground contact checks, therefore some effort can be saved.Always on Ground - используется для оптимизации: если машина не предназначена для полетов, не требует проверки контакта с землей, поэтому можно сэкономить некоторые усилия.
- Take-off Speed Damping — gradual slowing down of the wheel rotation after take-off to avoid its abrupt stop that looks unnatural.Take-off Speed Damping - постепенное замедление вращения колеса после взлета во избежание его резкой остановки, что выглядит неестественно.
- Contact Point Offset — the value (in meters) that allows fine-tuning the ground contact point for the wheel.Contact Point Offset - значение (в метрах), позволяющее точно настроить точку контакта колеса с землей.
- Wheel Steering — enables automatic steering of the wheel at the vehicle turning without any additional coding. You can also make the wheel rotate to the opposite direction by using the Invert Steering parameter and set the required Max Steering Angle.Wheel Steering - включает автоматическое подруливание колеса при повороте автомобиля без дополнительной кодировки. Вы также можете заставить колесо вращаться в противоположном направлении, используя параметр Invert Steering и установив требуемый Max Steering Angle.
- Emitter Node — a node that emits particles to create a certain effect such as dust, mud, or splashes generated by the wheels.Emitter Node - узел, который испускает частицы для создания определенного эффекта, такого как пыль, грязь или брызги, создаваемые колесами.
The ground contact check is fine-tuned via the WheelControl property that allows setting the update period for this check in times per second:Проверка контакта с землей настраивается с помощью свойства WheelControl, которое позволяет установить период обновления для этой проверки раз в секунду:

Aircraft LightsОгни самолетов#
This section contains actions to be performed for controlled aircraft lights (landing, taxi, beacon, navigation, etc.).Этот раздел содержит действия, которые необходимо выполнить для управляемых огней самолета (посадка, руление, маяк, навигация и т.д.).
- Assign the LightAircraftController property to the parent node (aircraft) and leave all parameters unchanged.Назначьте свойство LightAircraftController родительскому узлу (самолету) и оставьте все параметры без изменений.
-
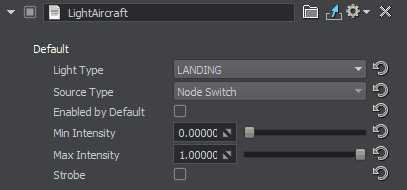
Assign the LightAircraft property to each node representing aircraft lights of various types.Назначьте свойство LightAircraft каждому узлу, представляющему огни самолетов различных типов.

- Set up the light parameters.Настройте параметры источника света .
Aircraft Lights ControlУправление огнями самолета#
Aircraft lights are controlled automatically by the IG. In case you implement some custom IG logic, you can control lights of an aircraft via code as follows:Освещение самолета автоматически управляется IG. Если вы реализуете некоторую настраиваемую логику IG, вы можете управлять освещением самолета с помощью кода следующим образом:
Aircraft lights control example:Пример управления огнями самолета:
// getting an aircraft entity by its ID (see data/ig_config.xml)
Entity *entity = ig_manager->getEntity(__entity_id__);

// getting a property for the component by its ID (see data/ig_config.xml)
PropertyPtr p_light_outer = entity->getComponent(__component_id_from_config__)->getProperty();

// enable all lights (landing, taxi, etc.) for the aircraft
p_light_outer->getParameterPtr("landing")->setValueToggle(1);
p_light_outer->getParameterPtr("taxi")->setValueToggle(1);
p_light_outer->getParameterPtr("navigation")->setValueToggle(1);
p_light_outer->getParameterPtr("beacon")->setValueToggle(1);
p_light_outer->getParameterPtr("strobe")->setValueToggle(1);
p_light_outer->getParameterPtr("logo")->setValueToggle(1);LightsОгни#
Lights available in the scene and not referring to any aircraft can also be controlled.Также можно управлять огнями, доступными в сцене и не относящимися к какому-либо самолету.
It is possible to control lights manually by assigning LightSourceComponent to them or automatically depending on time of day — in this case AutomaticTimeLightingComponent should be used.Можно управлять освещением вручную, назначив им LightSourceComponent, или автоматически в зависимости от времени суток - в этом случае следует использовать AutomaticTimeLightingComponent.
Interaction with WaterВзаимодействие с водой#
For objects and entities that are able to float on water, the WaterClamp property is available.Для объектов и сущностей, которые могут плавать на воде, доступно свойство WaterClamp.

The following parameters are available:Доступны следующие параметры:
- Clamp Enable — enabling the option identifies that the entity has the possibility to interact with the water surface (float on it), which is implemented according to IG commands. The Forced value makes the entity always be clamped to the water surface, which is suitable for boats, for example.Clamp Enable - включение опции определяет, что у сущности есть возможность взаимодействовать с водной поверхностью (плавать на ней), что реализовано согласно командам IG. Значение Forced заставляет объект всегда прикрепляться к поверхности воды, что подходит, например, для лодок.
- Point Front Center — front waterline point.Point Front Center - точка передней ватерлинии.
- Point Back Left — rear left waterline point.Point Back Left - левая задняя точка ватерлинии.
- Point Back Right — rear right waterline point.Point Back Right - задняя правая точка ватерлинии.
- Intertia — relative weight value: the more the value, the heavier the object seems.Intertia - значение относительного веса: чем больше значение, тем тяжелее кажется объект.
The following adjustments should be done to make water clamping work properly:Для правильной работы Water Clamp необходимо выполнить следующие настройки:
- Intersection Mask of the Global Water object should be enabled and correlate with the IG terrain_intersection_mask.Intersection Маска объекта Global Water должна быть включена и соответствовать IG terrain_intersection_mask.
-
The entity should have the Ground Clamp attribute set to one of the following values:Сущность должна иметь для атрибута Ground Clamp одно из следующих значений:
- NON_CONFORMAL — the entity takes into account only the water height.NON_CONFORMAL - сущность учитывает только высоту воды.
- CONFORMAL — the entity takes into account both the height and the normals of the water surface.CONFORMAL - сущность учитывает как высоту, так и нормали водной поверхности.
Collision VolumesОбъемы для определения коллизий#
A collision detection volume is required for intersection and collision detection. When a collision detection volume passes through another collision detection volume, the IG registers a collision by sending a Collision Detection Volume Definition packet to the Host identifying the collided volumes.Для обнаружения пересечений и столкновений требуется коллизионный объем. Когда один коллизионный объем проходит через другой коллизионный объем, IG регистрирует столкновение, отправляя пакет Collision Detection Volume Definition на хост, который идентифицирует столкнувшиеся объемы.
In CIGI, the Collision Detection Volume Definition is a sphere or a cuboid through which collision testing is performed by the IG.В CIGI Collision Detection Volume Definition представляет собой сферу или кубоид, через который IG проводит проверку столкновений.
Via UNIGINE Editor various collision volumes (sphere, box, capsule, cylinder, convex hull) may be used thus allowing a better approximation.При помощи UNIGINE Editor можно использовать разные коллизионные объемы (сфера, кубоид, капсула, цилиндр, выпуклый многогранник), что позволяет лучше аппроксимировать объем.
To use this option, create ObjectDummy and BodyDummy inside the entity NodeReference and add the corresponding entry in ig_config.Чтобы использовать эту опцию, создайте ObjectDummy и BodyDummy внутри сущности NodeReference и добавьте соответствующую запись в ig_config.
Then enable collision for the volume either via code (Entity::setCollision) or using CIGIEntityControlPacket (set the collision flag to 1 on the host to enable intersection detection with this entity).Затем включите коллизию для объема либо через код (Entity::setCollision) либо с помощью CIGIEntityControlPacket (установите значение 1 для флага коллизии на хосте, чтобы включить обнаружение пересечения с этой сущностью).
SynchronizationСинхронизация#
When running IG with Syncker, it is required to synchronize entities to have their movements displayed both on the master and slave computers. This can be done either via code (Master::addSyncNode()), or using the property: in the Editor, assign the AddSyncNode property to the nodes that should be synchronized.При запуске IG с Syncker требуется синхронизировать объекты, чтобы их движения отображались как на главном (Master), так и на подчиненных компьютерах (Slaves). Это можно сделать либо с помощью кода (Master::addSyncNode()), либо с помощью свойства: в редакторе назначьте свойство AddSyncNode узлам, которые должны быть синхронизированы.
Информация, представленная на данной странице, актуальна для версии UNIGINE 2.18.1 SDK.
