Setting Up Materials
The multi-purpose Parameters window provides access to all available parameters of the selected material.
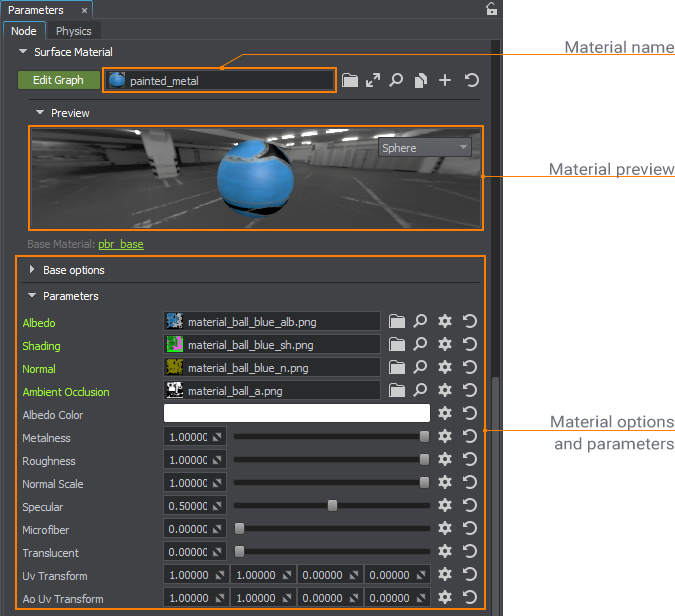
Via this window, you can change a name of the selected material, set up its transparency, rendering into the viewport, rendering of shadows, specify states, textures, and parameters of the material.
Materials can be created by inheriting from the base materials or via Material Editor.
- Only user materials can be modified via this window. Settings of base and manual materials are read-only.
- All changes to materials are saved automatically as you make them.
Multi-Selection Editing#
As well as for nodes, UNIGINE Editor allows multi-selection editing for materials. Select several materials in the Materials Hierarchy window and tweak the required settings. For example, you can specify transparency options for several materials at once and then adjust other settings of each particular material (e.g., specify albedo color, roughness, transparency multiplier and so on).
The selected user materials inherited from the different base materials can also be edited: only settings that are common for all the selected materials will be visible in the Parameters window.
Preview Panel and Material Name#
The selected material is shown as applied to a selected object in the Preview Panel. You can change the display object and rotate the it with a mouse, holding the left button pressed.
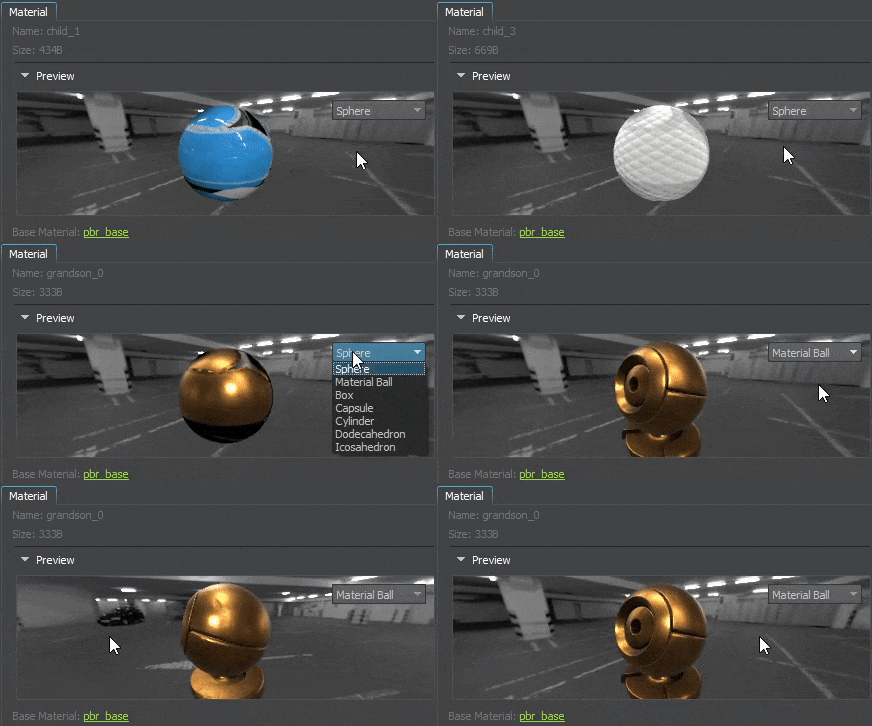
A name of the selected material is displayed to the left of the Preview Panel. It is editable, so you can rename the material.
Common Tab#
The Common tab contains common material settings. These settings are the same for almost all materials except the water_global_base and water_mesh_base ones.
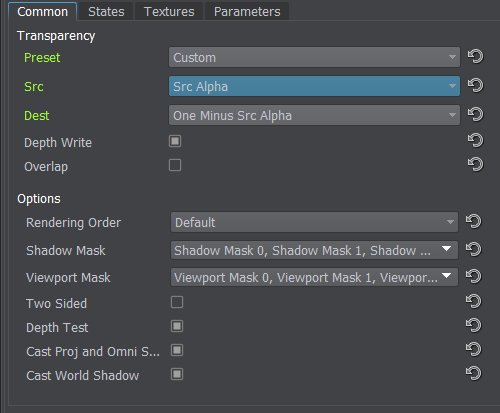
Transparency#
This section contains transparency settings:
| Preset |
Blending presets. One of the following can be selected:
|
|---|---|
| Src | Option used to scale the source color (the color of an overlaying material). Available only when Custom preset is selected. |
| Dest | Option used to scale the destination color (the color of an obscured material). Available only when Custom preset is selected. |
| Depth Write | Toggles writing in the depth buffer for the material on and off. This option can be used for transparent objects to prevent them from obstructing the others. With this option enabled the inner part of a transparent object won't be rendered if the outside surface was rendered first. The same can happen to a concave object. |
| Overlap | Render polygons, to which the material is applied, on the top of the render. This can be used for UI elements. |
Options#
This section contains common material options:
| Rendering Order | Sort order used when rendering transparent objects (objects that are assigned materials with the Alpha Blend, Additive, and Multiplicative presets). Objects with the lowest order numbers are rendered first, and objects with the highest order numbers are rendered last. |
|---|---|
| Shadow Mask | A shadow mask of the material. A surface, having this material assigned, casts shadows from a light source, if its surface and material shadow masks match the shadow mask of a light source (one bit at least). |
| Viewport Mask | A viewport mask of the material. A surface, having this material assigned, is rendered into a viewport, if its surface and material viewport masks match the viewport mask of the camera (one bit at least). |
| Two Sided | Rendering of polygons, to which the material is applied, two times per lighting pass. The option should be disabled to gain performance, if there is no need to render both sides of the polygons. |
| Depth Test | Depth testing for the material. This option can be used to make the object visible, when occluded by other objects (e.g. a character behind a wall). |
| Cast Proj and Omni Shadow | Render polygons, to which the material is applied, casting shadows from Omni and Proj light sources. |
| Cast World Shadow | Render polygons, to which the material is applied, casting shadows from World light sources. |
States Tab#
The States tab contains a set of flags that are used for a shader corresponding to the material.
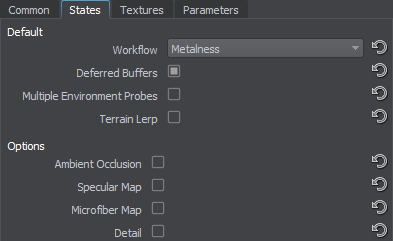
A set of states can differ depending on the base material. States define a set of textures and parameters of the material. Detailed descriptions of states for each particular material are available in the corresponding article of the Built-In Base Materials section.
Textures Tab#
The Textures tab contains paths to textures used by the material.

A set of textures can differ depending on the base material and the states enabled for the selected material. Detailed descriptions of textures for each particular material are available in the corresponding article of the Built-In Base Materials section.
The following settings are available for each texture:

Parameters Tab#
The Parameters tab contains parameters associated with the available states.
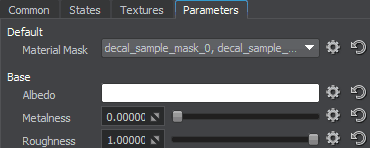
For every parameter, there are two modes available. They can be selected by clicking the Gear icon next to the relevant parameter:

- Simple mode provides adjustment of the default parameter value.
-
Expression mode allows using expressions in the parameter field. The type of the expression result must be one of the following:
-
int — an integer value.
With the input value of 4, the result will be equal to vec4(4.0f, 4.0f, 4.0f, 4.0f)
-
long — a long integer.
With the input value of 2L, the result will be equal to vec4(2.0f, 2.0f, 2.0f, 2.0f)
-
float — a floating point value.
With the input value of 3.0f, the result will be equal to vec4(3.0f, 3.0f, 3.0f, 3.0f)
-
double — a double value.
With the input value of 7.4, the result will be equal to vec4(7.4, 7.4, 7.4, 7.4)
-
vec3 — a vector of three float components.
With the input value of vec3(2.0f, 2.0f, 2.0f), the result will be equal to vec4(2.0f, 2.0f, 2.0f, 1.0f)
-
vec4 — a vector of four float components.
With the input value of vec4(2.0f, 2.0f, 2.0f, time), the result will change each frame due to time.
-
dvec3 — a double point value.
With the input value of dvec3(2.0, 2.0, 2.0), the result will be equal to vec4(2.0f, 2.0f, 2.0f, 1.0f)
-
dvec4 — a double point value.
With the input value of dvec4(2.0, 2.0, 2.0, 2.0), the result will be equal to vec4(2.0f, 2.0f, 2.0f, 2.0f)
A number of aliases to variables and functions are available from the expression, for convenience:
- ifps — a global variable referring to the engine.game.getIFps() function.
- time — a variable referring to the engine.game.getTime() function.
- noise(float pos, float size, int frequency) — a function referring to the engine.game.getNoise1() function.
- random(float from, float to) — a function referring to the engine.game.getRandomFloat() function.
- getNode() — a function returning a current node pointer.
- getParent() — a function returning a parent node pointer.
- getNumChildren() — a function returning the number of children nodes.
- getChild(int num) — a function returning a node child by its number.
- getState(string name) — a function returning a specified state of the current material.
- getParameter*(string name) — a function returning the value of a specified parameter of the current material.
-
The UV Transform parameter additionally has the Animated mode, which allows procedural animation of texture coordinates by fine-tuning the following values:
- Scale X — the first component of the vector defining the scale along the X axis.
- Scale Y — the second component of the vector defining the scale along the Y axis.
- Frequency — the frequency of the circular motion.
- Amplitude — the maximum extent of the circular motion, in pixels.
- Velocity — the velocity of the constant linear offset, in pixels per frame.
- Angle — the direction of the constant linear offset, in degrees.
A set of parameters can differ depending on the base material and states enabled for the selected material. Detailed description of parameters for each particular material is available in the corresponding article of the Built-In Base Materials section.
Video Tutorial: Materials#
The information on this page is valid for UNIGINE 2.20 SDK.