植被:创作技巧

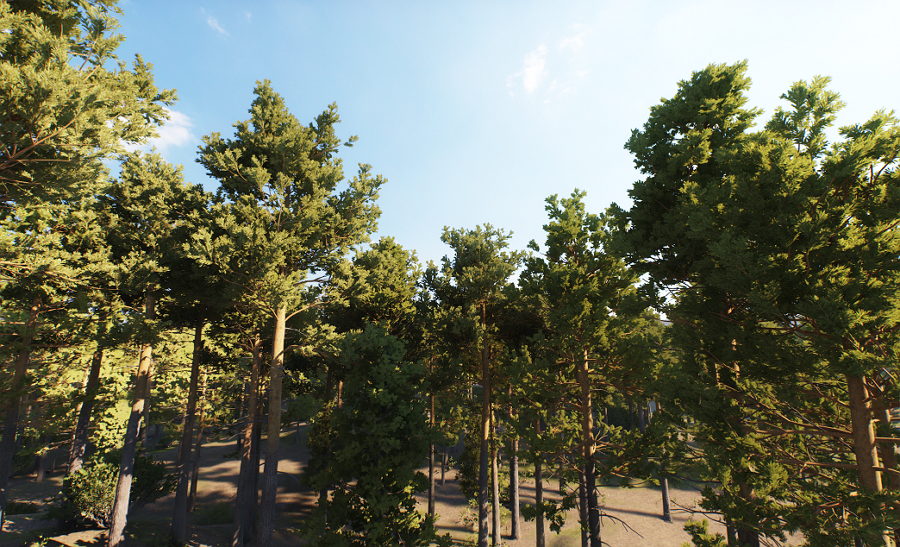
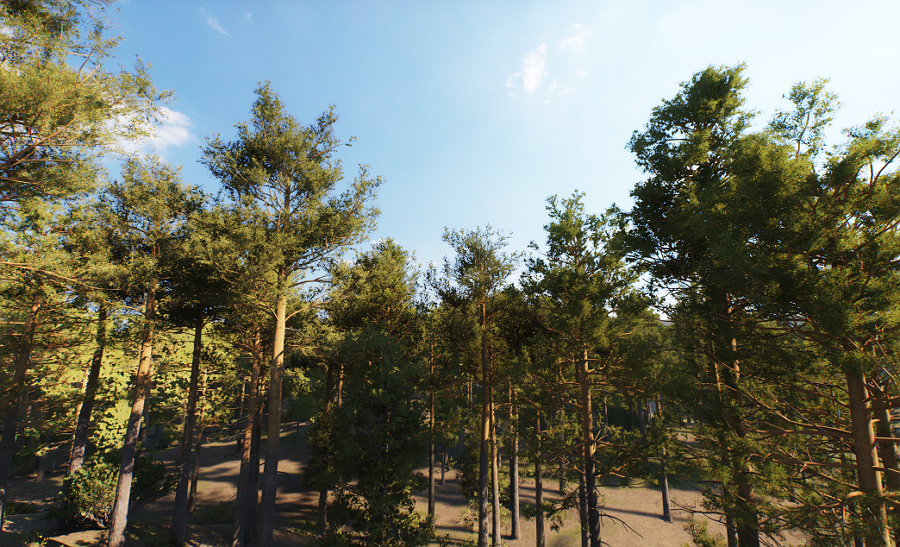
 This article describes principles of modeling and configuring plants and ways to achieve the best performance in scenes with dense vegetation in UNIGINE.本文介绍了在UNIGINE中对植被进行建模和配置的原则,以及在密集植被场景中实现最佳性能的方法。
Polygon Plants多边形植物#
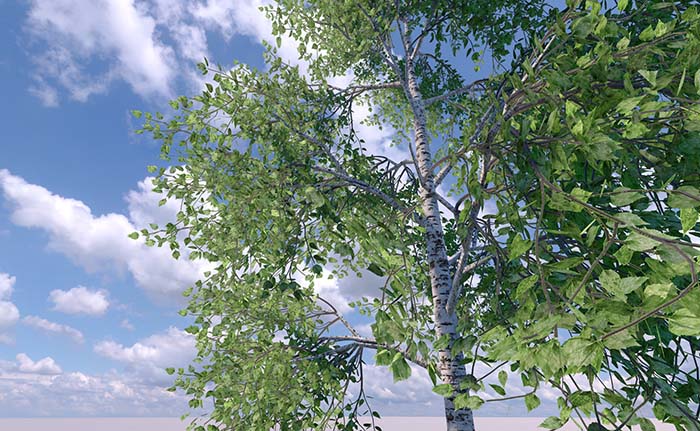
Models of plants based on polygon meshes should be used for close-ups and middle distances for the most realistic representation of real-life greenery. It is crucial to use optimized 3D models of trees in real-time projects.基于多边形网格的植物模型应用于近距离和中距离的场景,以实现最逼真的真实植被表现。在实时项目中使用优化的3D树木模型至关重要。
This section will introduce you to some vegetation authoring tips in UNIGINE and third-party Digital Content Creation software.本节将向您介绍在UNIGINE和第三方数字内容创作软件中创建植被的一些技巧。
Modeling建模#
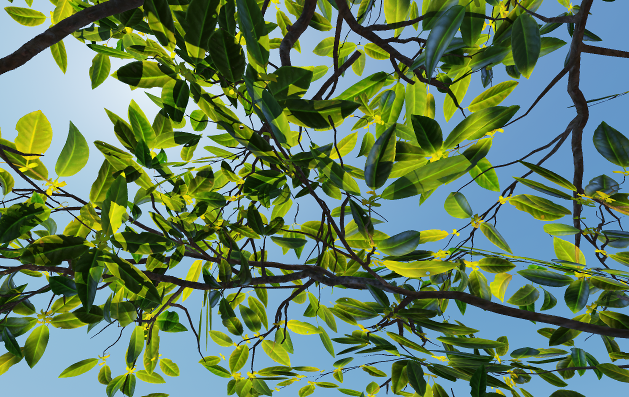
When preparing a 3D model of a tree with dense foliage, avoid creating topology for all branches and leaves; instead, it is much more efficient performance-wise to simulate fine details with textures. The main rule of models optimized for use in real-time is "the fewer polygons — the better". Following this rule is much more critical for rendering a dense forest filled with multiple types of plants and grasses.在准备具有茂密树叶的树木3D模型时,避免为所有树枝和树叶创建拓扑结构;相反,使用纹理模拟细节在性能上更为高效。优化用于实时渲染的模型的主要规则是“多边形越少越好”。在渲染充满多种植物和草地的茂密森林时,遵循这一规则尤为重要。
Therefore, it is highly recommended to prepare several levels of detail (LODs) for a plant to be used at different distances from the camera.因此,强烈建议为植物准备多个细节层次(LOD),以便在不同距离下使用。
The overall workflow of modeling a tree is as follows:树木建模的整体工作流程如下:
-
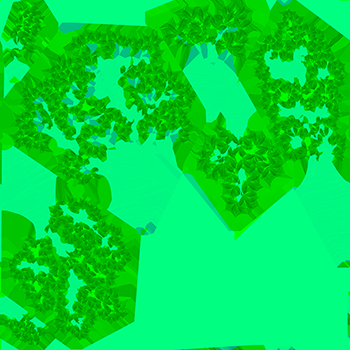
Model several small branches with leaves and bake the models into texture atlases — the obtained textures are going to be your foliage textures. Here are examples of such textures:模型化几个带有树叶的小树枝,并将模型烘焙到纹理图集中——获得的纹理将作为您的树叶纹理。以下是此类纹理的示例:
-
Create low-poly meshes that will represent foliage chunks, map UVs for proper texturing. The chunks do not have to be flat, you can experiment with the shape and bend of meshes. It is also important to prepare at least 3 LODs, so make sure to optimize the meshes of LODs to the full extent:创建表示树叶块的低多边形网格,映射UV以进行适当的纹理处理。块不必是平面的,您可以尝试网格的形状和弯曲。同时,准备至少3个LOD,确保优化LOD的网格:
 Foliage LODs树叶 LOD
 -
Create the trunk with large branches and levels of detail for it. Prepare and assign necessary textures and materials.创建树干和大树枝,并为其准备细节层次。准备并分配必要的纹理和材质。
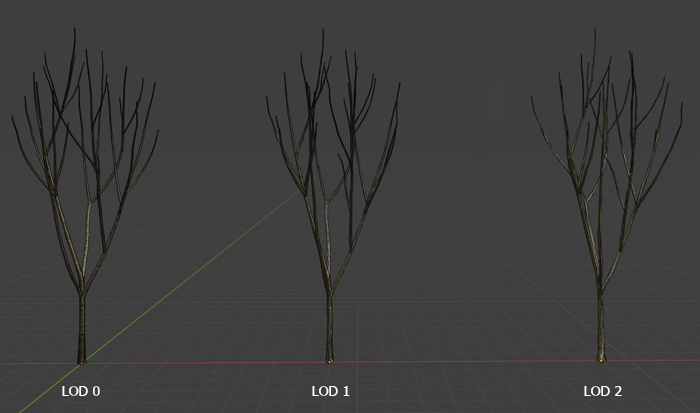 Trunk LODs树干 LODAlso, it is recommended to transfer normals from the trunk to the adjoined vertices of branches to make a more natural look of joints:建议将法线从树干转移到相邻的树枝顶点,以使连接处看起来更自然:
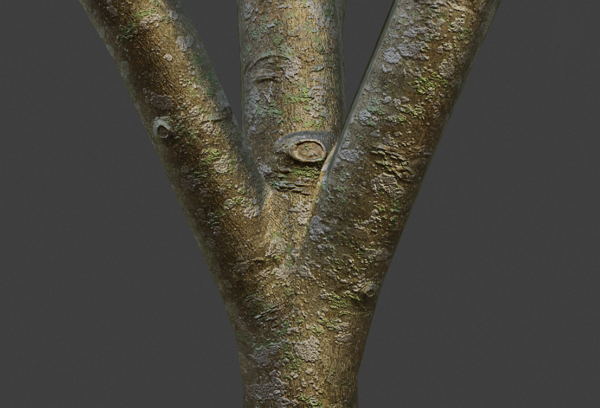 Adjusted normals of branches at joints provide a more natural look调整后的树枝法线使连接处看起来更自然
 -
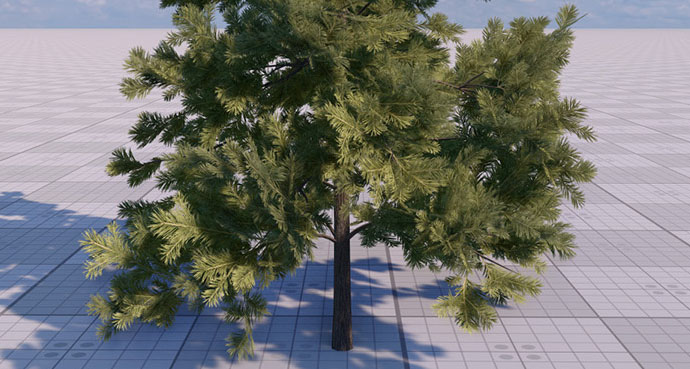
Scatter the LODs of foliage chunks over branches of the corresponding trunk LODs forming the tree crown:将树叶块的LOD散布在相应树干LOD的树枝上,形成树冠:
 The fact that the same number of chunks is used on all LODs may result in a higher polygon count. However, this approach has a number of advantages:在所有LOD上使用相同数量的块可能会导致多边形数量增加。然而,这种方法有许多优点:
- High diversity of branches makes it possible to create more realistic plants.高多样性的树枝可以创建更逼真的植物。
- A better, almost seamless transition between LODs. All elements can be adjusted at any time to get rid of any inconsistencies.更好的、几乎无缝的LOD过渡。所有元素都可以随时调整以消除任何不一致。
- A more permissive art pipeline enables the artists to collect trees of different sizes and ages out of the same chunks.更宽松的艺术流程使艺术家能够从相同的块中收集不同大小和年龄的树木。
- Accurate work of post effects even on the lowest LODs (SSAO, SSGI, etc.).即使在最低的LOD上,后期效果(SSAO, SSGI 等)也能准确处理。
- It is also recommended to create a separate low detail foliage LOD to simplify shadow casting. You can duplicate the lowest LOD and optimize it even more for this purpose and configure shadow casting in UNIGINE.建议创建一个单独的低细节树叶LOD以简化阴影投射。您可以复制最低的LOD并进一步优化,并在UNIGINE中配置阴影投射。
-
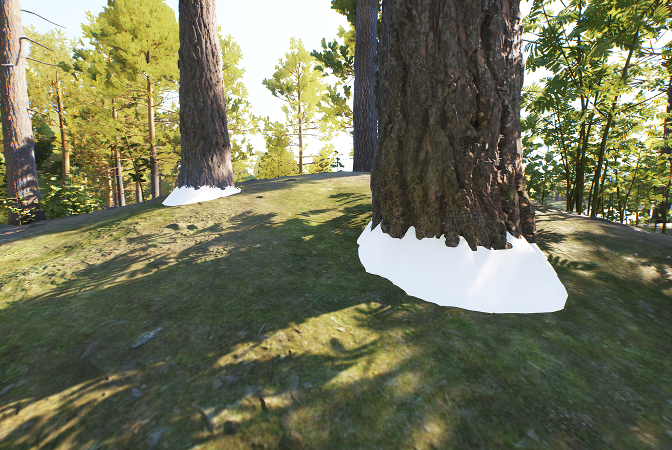
For better blending with terrain, prepare a separate bottom part of the trunk with a new material assigned. You can merge it to the mesh of the highest LOD for convenience:为了更好地与地形混合,准备一个单独的树干底部部分,并分配新的材质。为了方便,您可以将其合并到最高LOD的网格中:

-
Orient the model so it will be imported in UNIGINE appropriately, reset all transformations.调整模型的方向,使其在UNIGINE中正确导入,重置所有变换。Pay attention to the correct position of the mesh's pivot point (apparently, all the LODs must have the same position). As a rule, the pivot is placed at the bottommost point of the plant for ease of world design. However, you can alter the position of the pivot if this is needed for stem animation.注意网格的枢轴点的正确位置(显然,所有LOD必须具有相同的位置)。通常,枢轴点位于植物的最底部,以便于世界设计。但是,如果需要茎干动画,可以更改枢轴点的位置。
-
As a result, the model has the following content:最终,模型包含以下内容:
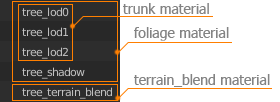 For convenience, it is recommended to add postfixes to the names of levels of detail that will be used later during import.为了方便,建议在LOD的名称中添加后缀,以便在导入时使用。
 - Consider further adjustment of vertex normals and vertex colors and UVs for leaves animation.考虑进一步调整顶点法线、顶点颜色和UV以进行树叶动画。
- Export the model to the recommended FBX format.将模型导出为推荐的FBX格式。

Configuring the Look of the Plant配置植物的外观#
Import the created model to UNIGINE following the FBX Import Guide and add the plant to the scene.按照FBX导入指南将创建的模型导入UNIGINE,并将植物添加到场景中。
To make all separate objects surfaces of the single Mesh Static, enable Merge Static Meshes in the import settings.要使所有单独的对象成为单个Mesh Static的表面,请在导入设置中启用Merge Static Meshes。

Setting Up LODs设置 LOD#
Set the visibility distances for LODs by enabling the Combine By Postfixes option and adjusting values in the import settings.通过启用Combine By Postfixes选项并在导入设置中调整值来设置LOD的可见距离。
The video tutorial is created using SDK version 2.13. The general workflow demonstrated in the tutorial is applicable for versions up to 2.19. However, specific details such as UI may differ across various versions.视频教程使用SDK 2.13版本创建。教程中演示的一般工作流程适用于2.19及以下版本。但是,UI等具体细节可能因版本而异。Shadow LOD阴影LOD#
When dynamic shadow casting is used, all polygons are rendered one more time for each light source with shadows enabled. World light sources can have up to 4 shadow cascades, so the number of polygons rendered into shadow maps can be tremendous, leading to a strong performance hit. You can estimate this number by using the Rendering Profiler.当使用动态阴影投射时,所有多边形都会为每个启用了阴影的光源再次渲染。World光源最多可以有4个阴影级联,因此渲染到阴影贴图中的多边形数量可能非常巨大,导致性能大幅下降。您可以使用渲染分析器来估算此数量。
That is why it is a best practice to use a low-poly mesh for foliage shadows. Perform the following steps:因此,最佳实践是使用低多边形网格进行树叶阴影。执行以下步骤:
-
Disable shadow casting for all foliage LODs except the Shadow LOD. You can do it in one of the following ways:禁用所有树叶LOD的阴影投射,除了阴影LOD。您可以通过以下方式之一执行此操作:
- By disabling the Cast Proj and Omni Shadows and Cast World Shadows flags.禁用 Cast Proj and Omni Shadows 和 Cast World Shadows 标志。
- By toggling off all bits of the Shadow Mask.切换Shadow Mask(阴影掩码)的所有位。
- Hide the shadow LOD for any camera by toggling off all bits of its Viewport Mask.通过其Viewport Mask(视口掩码)的所有位,隐藏阴影LOD以使其对任何摄像机不可见。
See the demonstration of configuring a shadow LOD in the Bit Masking video tutorial.有关配置阴影LOD的演示,请参阅位掩码视频教程。
Materials Adjustment材质调整#
If the Import Materials flag was enabled in the import options, all necessary materials are already generated and assigned to the surfaces of the tree. Let's consider material parameters that worth being noted:如果在导入选项中启用了 Import Materials 标志,则所有必要的材质都已生成并分配给树的表面。让我们考虑一些值得注意的材质参数:
- Make the leaves material Alpha-Test to cut out texels according to the Alpha channel of the Albedo texture.使叶子材质为 Alpha-Test,以根据 Albedo 纹理的 Alpha 通道剪切纹理像素。
-
If specular highlights are incorrect, it is recommended to set the Specular value to 0.如果高光不正确,建议将 Specular 值设置为 0。
 Incorrect lighting on the Reflections Rendering Debug preview (left) and the result image (right)反射渲染调试预览(左)和结果图像(右)中的光照不正确
 -
Consider enabling the Two Sided option for the material to make the foliage denser. Be careful, as it may significantly affect performance if there are too many polygons in the scene.考虑启用材质的Two Sided选项以使树叶更密集。请注意,如果场景中有太多多边形,这可能会显著影响性能。It may be better to switch the Backside Normal mode to the To Front Side option since it usually provides more realistic results for foliage.将Backside Normal(背面法线)模式切换为To Front Side(向前)选项,因为这通常为树叶提供更逼真的结果。
-
If textures make it evident that foliage is made of flat chunks, a great solution to this is the Angle Fade feature that cuts out polygons faced to the camera at extreme angles.如果纹理显示树叶由平面块组成,一个很好的解决方案是使用Angle Fade(角度淡出)功能,该功能在极端角度下剪切面向摄像机的多边形。

 注意This feature may work incorrectly for meshes that have modified normals.此功能可能对修改过法线的网格无法正常工作。
 -
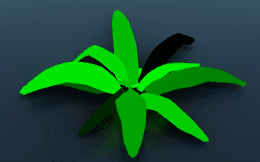
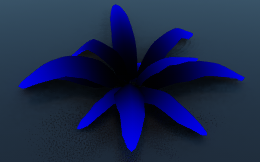
Adjusting translucency for the foliage material is necessary for a better look. Increase the Translucent value to permit light to pass through the object.调整树叶材质的半透明度以获得更好的外观。增加Translucent(半透明)值以允许光线穿过对象。

 You can also enable the use of the Translucent Map in the States tab to specify a single-channel texture that will define parts of the object that aren't translucent (such as branches).您还可以在States(状态)选项卡中启用Translucent Map(半透明贴图),以指定定义对象不透明部分(如树枝)的单通道纹理。注意
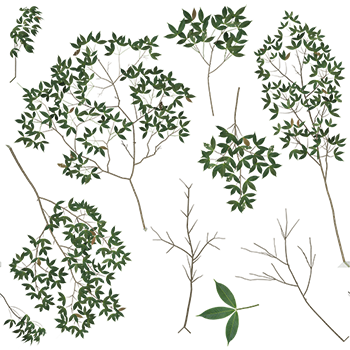 Albedo texture反照率纹理
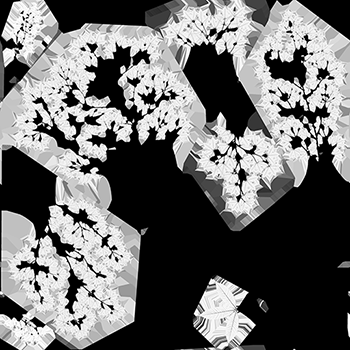 Translucent texture半透明纹理
 -
Enable the Terrain Lerp flag for the material of the bottom part of the tree to blend your tree with a Terrain in your scene.启用底部树干的材质的Terrain Lerp(地形插值)标志,以将您的树与场景中的地形混合。

Vertex Normals Adjustment顶点法线调整#
The fact that foliage is composed of flat chunks results in inaccurate shading. To counteract this and hide the flatness of the mesh, adjust vertex normals and improve the way the foliage is shaded.由于树叶由平面块组成,导致着色不准确。为了抵消这一点并隐藏网格的平面性,调整顶点法线并影响树叶的着色。
The following solutions are possible:以下是可能的解决方案:
-
Enable the Normals Rotated To Camera option so all surface normals will be oriented towards the camera, ignoring the geometry normals. This feature checks out as a quick solution, although it makes all polygons shaded the same way.启用 Normals Rotated To Camera(法线旋转到摄像机)选项,使所有表面法线朝向摄像机,忽略几何法线。此功能作为快速解决方案,尽管它使所有多边形以相同的方式着色。

-
Edit vertex normals manually in your modeling software. Transfer vertex normals from a boundary cage to make the foliage look like a smooth and dense tree crown.在建模软件中手动编辑顶点法线。从边界笼传输顶点法线,使树叶看起来像光滑而密集的树冠。注意It is recommended to use a dome-like boundary cage with the sides elongated to the ground to avoid shading errors on lower polygons.建议使用圆顶状的边界笼,边向地面拉长,以避免较低多边形上的着色错误。
 Transferring normals from a boundary cage从边界笼转移法线As a result, the flatness of foliage geometry is less evident (on the right):结果,树叶几何的平面性不那么明显(右侧):
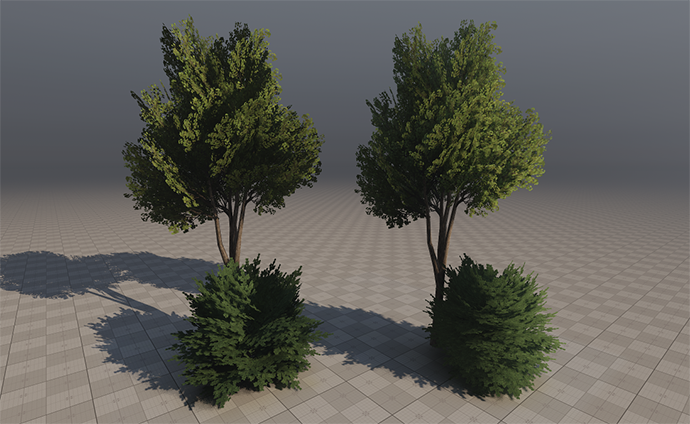
MIP MapsMIP 贴图#
The MipMapping technique, supported by UNIGINE renderer, implies sampling lower textures for smaller and distant polygons. At that, minor features of foliage start wiping away with the distance. In some cases, branches and leaves look thicker when far from the camera than on a close-up view.UNIGINE 渲染器支持的MipMapping技术意味着为较小和较远的多边形采样较低的纹理。在这种情况下,树叶的微小特征会随着距离的增加而逐渐消失。在某些情况下,远离摄像机的树枝和树叶看起来比近距离视图更厚。

MIP mapsMIP 映射This issue can be resolved via these approaches:可以通过以下方法解决此问题:
- Engage the Mip Bias feature to shift the distance at which the switch between MIP-levels is performed. This option significantly affects the performance.使用 Mip Bias 功能来来调整MIP级别之间切换的距离。此选项显著影响性能。
- By default, MIP maps for a texture are generated automatically on import using the Box filtering that may provide too blurred results. Consider switching to the Point filtering type to get sharper MIP maps.默认情况下,纹理的 MIP 贴图在导入时使用 Box 过滤自动生成,可能会提供过于模糊的结果。考虑切换到 Point 过滤类型以获得更清晰的MIP贴图。
-
You can also prepare custom MIP maps in third-party software. For example, here is a comparison between MIP maps generated using the Box filtering and the sharper Kaiser filtering:您还可以在第三方软件中准备自定义MIP贴图。例如,以下是使用Box过滤和更清晰的Kaiser过滤生成的MIP贴图的比较:
 To import a texture with custom MIP-levels, use the Combine option for a texture with laid out MIP-levels or save them to a .texture format and import the texture with the Unchanged option enabled.要导入具有自定义MIP级别的纹理,请使用Combine(组合)选项导入具有布局MIP级别的纹理,或将其保存为.texture格式并启用Unchanged(未更改)选项导入纹理。
Animation动画#
Enable the Vegetation state to activate a set of animation-related parameters.启用 Vegetation 状态以激活一组动画相关的参数。

Vegetation animation consists of Stem and Leaves animation. To enable both of them, set Animation to the Default or Field option.植被动画由茎干和树叶动画组成。要启用两者,请将Animation(动画)设置为Default(默认)或Field(场)选项。
At that, Field Animation makes the plant be affected by Field Animation volumes enabling you to override animation parameters locally (e.g., simulation of rotor downwash effects in close proximity to a rotorcraft).在这种情况下,Field Animation(场动画)使植物受到场动画体积的影响,使您能够局部覆盖动画参数(例如,模拟靠近旋翼机的旋翼下洗效果)。
Stem Animation茎干动画#
Stem animation applies vertex movement based on spatial 3D noise to simulate bending of the plant's trunk or stem caused by wind. The mesh's pivot point is considered fixed, and the further the vertex is along the Z axis, the stronger movement is applied to it.茎干动画基于空间3D噪声应用顶点移动,以模拟由风引起的植物树干或茎干的弯曲。网格的枢轴点被认为是固定的,顶点沿Z轴越远,应用的移动越强。
Thus, it is necessary to place the pivot point at the correct position (usually, it is the bottommost point of the stem) and orient the model, so the Z axis goes upwards.因此,必须将枢轴点放置在正确的位置(通常是茎干的最底部),并调整模型的方向,使Z轴向上。

Stem animation example茎干动画示例A set of Parameters controls the animation.一套控制动画的参数

Please note that all surfaces of the plant must have identical stem animation parameters in order to synchronize their movement.请注意,植物的所有表面必须具有相同的茎干动画参数才能同步它们的运动。

Different stem animation parameters result in not synchronized parts of the tree不同的茎干动画参数导致树的部分不同步Leaves Animation树叶动画#
The Leaves animation is another layer of vertex shader animation mainly applied to foliage, providing additional detail bending. Using this type of animation requires preliminary adjustment to geometry on the modeling stage.树叶是顶点着色器动画的另一层,主要用于树叶,提供额外的细节弯曲。使用此类型的动画需要在建模阶段对几何体进行初步调整。
Several approaches of leaves animation are available out of the box. Choose the type of animation using the Leaves option.有几种种现成的树叶动画方法。使用Leaves(树叶)选项选择动画类型。
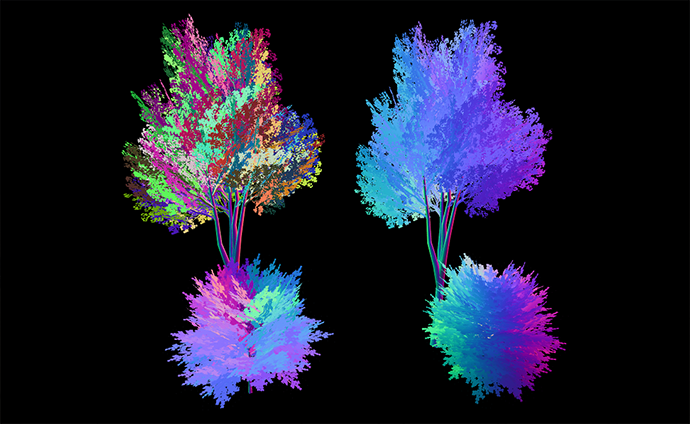
Geometry Vertex Color Based基于顶点颜色的几何#
This recommended approach providing the best control over foliage implies that leaves are rendered as polygons, and vertex colors are used for animation.这种推荐的方法提供了对树叶的最佳控制,意味着树叶作为多边形渲染,并使用顶点颜色进行动画。
Vegetation movements are defined by RGB channels of vertex colors as follows:植被运动由顶点颜色的RGB通道定义如下:
 |
Red channel is used for animation of smaller or peripheral parts of vegetation (leaves). Bright parts are animated, and dark parts are stiff.红色通道用于较小或外围植被部分(树叶)的动画。明亮部分被动画化,暗部分僵硬。 |
 |
Green channel is used to define the movement order for branches in order to desynchronize them. The movement sequence starts from the brightest element to the darkest.绿色通道用于定义树枝的运动顺序以使其不同步。运动序列从最亮的元素开始到最暗的元素。 |
 |
Blue channel is used to define which parts of branches can be bent. Brighter parts indicate bendable portions, and darker parts — stiff portions.蓝色通道用于定义树枝的哪些部分可以弯曲。较亮的部分表示可弯曲的部分,较暗的部分表示僵硬的部分。 |
The animation parameters control vertices movement:动画参数控制顶点运动:

It is also a regular practice to animate branches using this technique even if they are attached to the trunk:这也是使用此技术动画树枝的常规做法,即使它们附着在树干上:
The Green and Blue channels define the movement of vertices; the Red channel is not used for branches绿色和蓝色通道定义顶点的运动;红色通道不用于树枝At that, related surfaces must have the same vertex colors on adjacent vertices and identical animation parameters in order to synchronize their movement:在这种情况下,相关表面必须在相邻顶点上具有相同的顶点颜色和相同的动画参数,以同步它们的运动:

The colors of adjacent vertices of the trunk and foliage are the same, so the geometry stays connected when animated树干和树叶的相邻顶点的颜色相同,因此在动画时几何体保持连接

Geometry Vertex Color Based leaves animation基于几何顶点颜色的树叶动画Geometry UV-based基于UV的几何#
This is a rather legacy approach when leaves are rendered as standard polygons. It requires the UV Channel 2 to be defined for the mesh.这是一种较为过时的方法,当树叶作为标准多边形渲染时。它需要为网格定义UV通道2。
 Geometry UV-based animation基于 UV 的几何动画
 |
 UV Channel 2: the stiffest vertices are in the top left cornerUV 通道 2:最硬的顶点在左上角
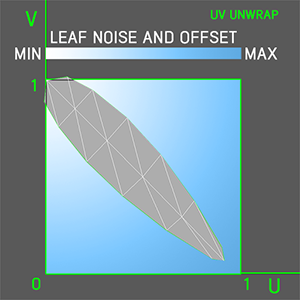
 |
Animation uses UV channel 2 of an object as follows: in the UV grid, [0,1] is the pivot point for the object's movements and the stiffest part of the object, and towards [1,0], the object becomes more flexible.动画使用物体的UV通道2如下:在UV网格中,[0,1]是物体运动的轴心点,也是物体最硬的部分,朝向[1,0],物体变得更加灵活.
|
|
Control the vertices movement via the same Animation Parameters.通过相同的控制顶点移动动画参数。
BillboardBillboard(广告牌)#
Billboard is the most performance-friendly way of animating distant vegetation: all quads are rendered as billboards that always face the camera; the UV Channel 2 defines the size and movement of polygons. Hence, the foliage mesh should contain only quad polygons for leaves.Billboard(广告牌)是最节省性能的动画远距离植被的方式:所有四边形都作为广告牌渲染,始终面向摄像机;UV通道2定义多边形的大小和运动。因此,树叶网格应仅包含用于树叶的四边形多边形。
 A billboards-based bush基于广告牌的灌木
 |
 The mesh of the bush灌木的网格
 |
Animation uses UV channel 2 of an object as follows: in the UV grid, [0,1] is the pivot point for the billboard's movements, and the billboard's size can be changed by scaling the polygon in the UV channel.动画使用对象的UV通道2如下:在UV网格中,[0,1]是广告牌运动的轴心点,可以通过缩放UV通道中的多边形来改变广告牌的大小。
 UV Channel 1UV 通道 1
 |
 UV Channel 2UV 通道 2
 |
 Mesh (above) and the result (below)网格(上)和结果(下)
 |
Control the polygons movement via the same Animation Parameters.通过相同的控制多边形运动动画参数。
Global Animation Options全局动画选项#
Stem and leaves animation are also controlled by the global Vegetation Animation Parameters. Via these settings, you can adjust stem and leaves animation intensity, speed, and wind effect globally and control the weather conditions per world.茎干和树叶动画也由全局植被动画参数控制。通过这些设置,您可以全局调整茎干和树叶动画的强度、速度和风效果,并控制每个世界的天气条件。

Note that the global parameters are just multipliers for the per-material animation parameters.请注意,全局参数只是每个材质动画参数的乘数。
Scattering Plants散布植物#
To randomly scatter a significant number of identical meshes across the terrain, Mesh Clutter is used. Mesh Clutter scatters objects procedurally and renders only those objects which are in the viewing frustum. The typical workflow is as follows:为了随机散布大量相同的网格在地形上,使用 Mesh Clutter。 Mesh Clutter程序化地散布对象,并仅渲染那些在视锥体内的对象。典型的工作流程如下:
-
Click Create -> Clutter -> Mesh and specify the .mesh asset to be used as the source mesh for the Mesh Clutter. Click within the viewport to place the new node in the world.单击 Create -> Clutter -> Mesh 并指定要用作 Mesh Clutter 的源网格的 .mesh 资源。在视口中单击以将新节点放置在世界中。注意.fbx assets are containers for .mesh assets, right-click on the asset and choose Open or double-click on it to access its content..fbx 资源是 .mesh 资源的容器,右键单击资源并选择 Open 或双击它以访问其内容。


-
If you already have a configured tree in your world, you can copy all materials and parameters from surfaces of the configured tree and paste them sequentially or by surface names to Mesh Clutter.如果您已经在世界中配置了一棵树,您可以从配置的树的表面复制所有材质和参数,并按表面名称或顺序粘贴到 Mesh Clutter。
-
Place the node in the scene and set the Size to cover the whole playable area.将节点放置在场景中并设置 Size 以覆盖整个可玩区域。注意The operation of Mesh Clutter objects is float-based, so it is not recommended to use Sizes bigger than 10000 units lengthwise and widthwise. If you need to fill areas beyond this limit, you will need to manually split the single Mesh Clutter object into a grid of several clutters.Mesh Clutter 对象的操作是基于浮点的,所以不建议使用大于 10000 单位的 Size 纵向和横向。如果您需要填充超出此限制的区域,则需要手动将单个 Mesh Clutter 对象拆分为由多个Clutter组成的网格。Sandworm Tool does the slicing automatically when generating terrain.Sandworm在生成地形时自动进行切片。
- Adjust the scattering parameters: set the desired Density in meshes per square unit; diversify the appearance of the forest by randomizing the Scale, Offset, and Rotation parameters.调整散布参数:设置每平方单位所需的密度;通过随机化Scale、Offset 和 Rotation参数来多样化森林的外观。
-
Make the clutter object child to the terrain and enable the Intersection flag to make trees follow the surface.使Clutter对象成为地形的子对象,并启用Intersection标志以使树木跟随表面。
 注意If the Intersection flag is enabled, toggle it off and on to forcefully re-generate the Clutter object.如果已启用 Intersection 标志,请将其关闭再重新打开,以强制重新生成 Clutter 对象。
 - Adjust the Visibility and Fade distances. Given the number of polygons a dense forest may consist of, it is recommended to make Mesh Clutter visible as close as possible and use Impostor objects at a farther distance.调整可见性和淡出距离。考虑到在茂密森林中可能涉及的多边形数量,建议使Mesh Clutter在尽可能短的距离内可见,并在更远的距离上使用Impostor对象。
-
By default, trees are scattered across the whole area. You can mask areas with vegetation via the following approaches:默认情况下,树木散布在整个区域。您可以通过以下方法屏蔽植被区域:
-
By using a single-channel texture. You can prepare a texture in third-party software or create a new one and draw the mask from scratch. All Mesh Clutter and Grass objects that use that texture are updated on the fly.使用单通道纹理。您可以在第三方软件中准备纹理或创建新纹理并从头绘制掩码。所有使用该纹理的Mesh Clutter和Grass对象都会实时更新。

-
By using Landscape Terrain masks. You can use the data of Landscape Terrain masks to define the density of the vegetation, provided your world contains Landscape Terrain with configured masks: select the desired mask in the Mask Terrain parameter:使用地形掩码。如果您的世界包含配置了掩码的Landscape Terrain,您可以使用Mask Terrain的数据来定义植被的密度。
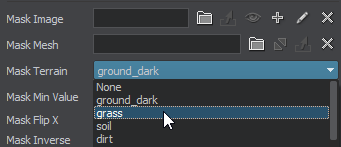
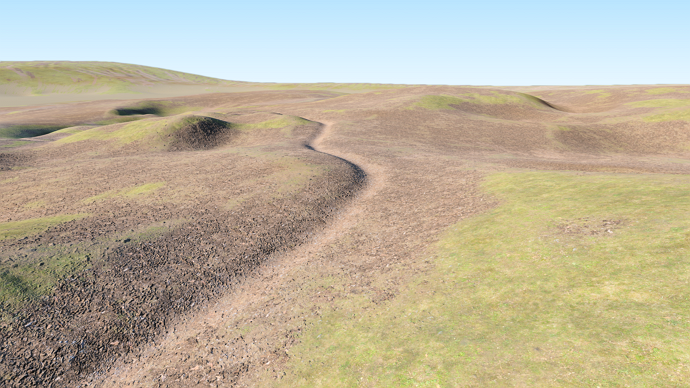 Landscape TerrainLandscape Terrain
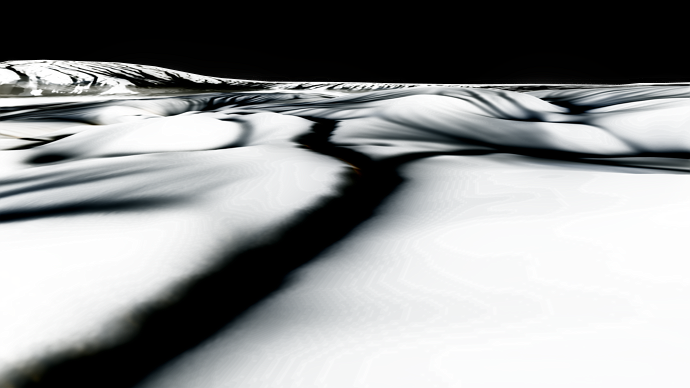 Mask preview of Landscape TerrainLandscape Terrain 的掩码预览
 Vegetation is scattered according to the terrain mask植被根据地形掩码散布You can also edit the mask by using the Brush Editor and have the Mesh Clutter updated on the fly.您还可以使用画笔编辑器编辑掩码,并实时更新 Mesh Clutter。注意All Landscape Terrain data, including masks, is subject to data streaming. If you have unoptimized streaming settings, there might be a bottleneck in mask data loading on world startup and changing the camera position, affecting the performance of Mesh Clutter generation.所有Landscape Terrain数据,包括掩码,都会受到数据流传输的影响。如果您的流传输设置未优化,在世界启动或更改相机位置时,掩码数据的加载可能会出现瓶颈,从而影响 Mesh Clutter 的生成性能。
 -
As an additional feature, masking by a mesh is also available:您还可以通过使用网格进行掩码:


-
Cutout by intersection with objects:通过与对象相交进行裁剪:
- Create Mesh Static or Decal representing a bounding cutout volume. Enable the Clutter Interaction flag for it.创建表示裁剪体积边界的 Mesh Static 或 Decal,并启用 Clutter Interaction 标志。
- Choose and enable a bit of the Intersection mask of the object that will be used for the cutout feature.选择并启用要用于裁剪功能的对象Intersection 的一个位。
- Enable the same bit of the Cutout Intersection mask of the Clutter object.启用 Clutter 对象的 Cutout Intersection 掩码中相同的位。
- Hide the visual representation of the object from the camera by disabling all bits of its Viewport mask and disabling shadow casting for it.通过禁用其 Viewport 掩码的所有位并禁用阴影投射,隐藏该对象的视觉表现,使其不在相机中显示。
 Cutting out trees within a box在框内裁剪树木
-
-
Keep the optimal Step value for the best performance.保持最佳 Step 值以获得最佳性能。The Clutter is rendered as a 2D grid, in each cell of which meshes are randomly scattered depending on the density and probability of appearing. Generation of meshes in the cells is time-sliced starting from the nearest cells to reduce the load on the CPU.Clutter 渲染为 2D 网格,在每个网格单元中,网格会根据密度和出现概率随机分布。网格的生成采用时间切片方式,从最近的单元开始,以减少 CPU 负载。
 Cell division网格划分为单元The Step value defines the cell size in units. Thus, this value specifies the resulting number of cells along each axis (the size divided by the step). It is highly recommended to choose the values that are divided with no remainder.Step 值定义了单元的大小(单位为世界单位)。因此,该值决定了每个轴上的最终单元数(整体大小除以步长)。建议选择能够整除的数值。注意Each cell requires 1 DIP call, so the higher the number of cells (i.e., the smaller the step), the more reduced the performance is. However, creating a large cell takes a longer time. When the camera moves fast enough, small cells are created one by one very fast and smoothly, but large ones can noticeably pop into sight and cause a slight rendering lag.每个单元都需要进行一次 DIP调用,因此单元数量越多(步长越小),性能下降越明显。然而,创建较大的单元需要更长的时间。当摄像机移动速度较快时,较小的单元可以快速、平滑地逐个生成,而较大的单元可能会突然显现,导致轻微的渲染卡顿。
You can scatter bushes and chunks of polygon grass across the terrain the same way.您可以使用相同的方法在地形上散布灌木丛和多边形草块。
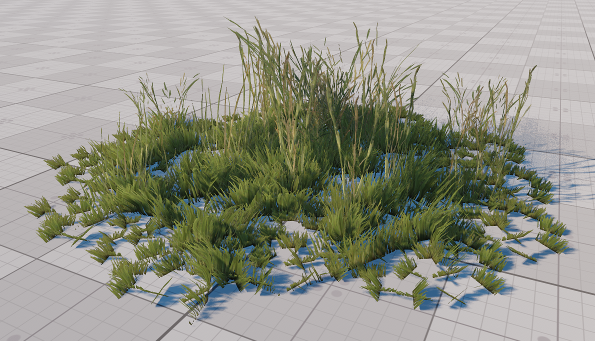
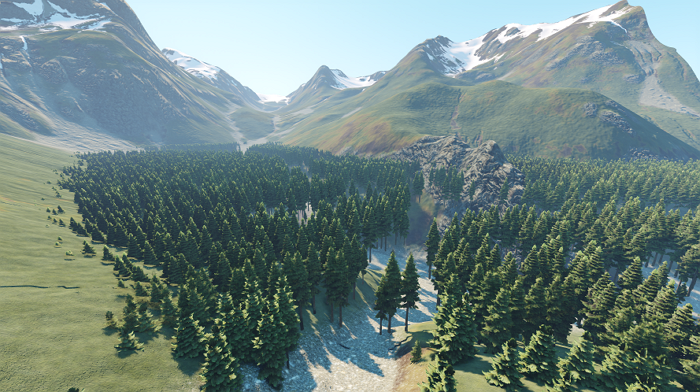
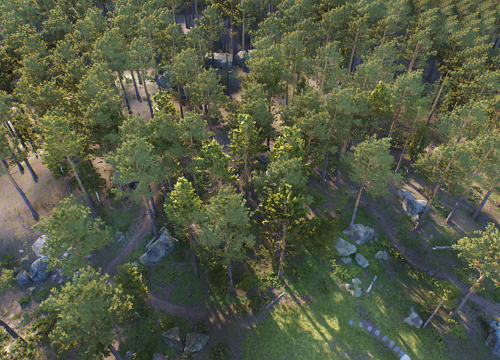
A chunk of optimized polygon-based grass一个经过优化的多边形草块示例Finally, by combining several clutters for different types of trees, bushes, and grass, you get a diverse look of vegetation.最后,通过结合不同类型的 树木、灌木和草地的 Mesh Clutter,可以打造更加多样化的植被景观。

Combination of several Mesh Clutter objects for diverse vegetation组合多个 Mesh Clutter 以实现多样化植被Manual Placement手动放置#
As a finishing touch, you can place trees as Static Mesh where needed. It is efficient performance-wise to collect a significant number of identical meshes into a Mesh Cluster object in order to treat and render a bunch of meshes as one object.作为最后的修饰,您可以在需要的地方将树木放置为Static Mesh。为了性能优化,将大量相同的网格收集到Mesh Cluster对象中,以便将一堆网格作为一个对象处理和渲染。
In terms of performance optimization, Mesh Cluster objects have an advantage over Mesh Clutter objects as meshes baked into clusters support culling by Occluders, making it possible to improve performance when some geometry occludes them (e.g., a building).在性能优化方面,Mesh Cluster 对象相比 Mesh Clutter 对象具有优势,因为烘焙到集群中的网格支持遮挡剔除,当某些几何体(例如建筑物)遮挡它们时,可以提高性能。You can bake identical meshes of their hierarchy or collect all similar meshes in the world. Refer to the dedicated article for more details on the ways of collecting a cluster.您可以烘焙其层级结构中的相同网格,或收集世界中所有相似的网格。有关集群网格的收集方法,请参阅相关文档。
The other convenient approach to quickly scatter clusters of grass, bushes and trees across the scene is using the mesh placement brush tool:另一种方便的方法是使用 网格放置画笔工具,快速在场景中散布草丛、灌木和树木集群。
-
Switch to the Cluster Editor mode:切换到Cluster Editor模式:

- Select one or several Mesh Cluster objects in the scene or create a new one by using the Create button in the Active Tool window.在场景中选择一个或多个 Mesh Cluster 对象,或使用 Active Tool 窗口中的 Create 按钮创建一个新对象。
-
Paint areas with brush, scattering meshes across the scene:用画笔绘制区域,在场景中散布网格:

- If needed, edit the cluster manually to reposition or remove some meshes.如果需要,可以手动编辑集群以重新定位或移除某些网格。
BillboardsBillboards(广告牌)#
Billboard is a flat rectangular object that always faces the camera. Using billboards instead of fully functional objects that are barely seen from far off significantly simplifies and speeds up rendering.Billboard(广告牌)是一个始终面向相机的平面矩形对象。使用广告牌代替几乎看不到的完整功能对象可以显著简化和加速渲染。
ImpostorsImpostor(替身)#
In terms of UNIGINE, Impostor is a billboard-like object capable of mimicking the appearance of polygon meshes by displaying different areas of textures depending on the angle of view. Impostor objects serve to speed up geometry rendering by reducing the number of polygons while saving visual fidelity.在UNIGINE中,Impostor(替身)是一种类似广告牌的对象,能够通过根据视角显示纹理的不同区域来模仿多边形网格的外观。替身对象通过减少多边形数量来加速几何渲染,同时保持视觉保真度。

Albedo texture for a tree impostor树替身的反照率纹理The built-in Impostor Creator tool makes it easy to generate Impostors for single meshes and Mesh Clutters.内置的 Impostor Creator(替身创建)工具可以轻松为单个网格和Mesh Clutter生成替身。
For a forest based on Mesh Clutter, the Grass object with the grass_impostor_base material will be used as a low-poly LOD. At that, the Clutter and grass parameters must match to make sure the position and orientation of all LODs are the same.对于基于 Mesh Clutter 的森林,将使用带有grass_impostor_base 材质的 Grass 对象作为低多边形LOD。在这种情况下, Cluttergrass参数必须匹配,以确保所有LOD的位置和方向相同。
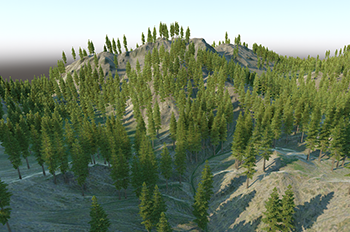 Mesh Clutter and ImpostorsMesh Clutter和替身
 |
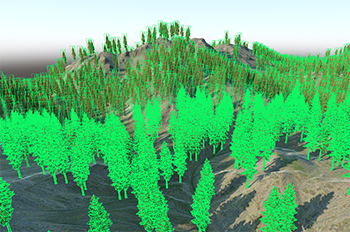 Meshes' and Impostors' Wireframes网格和替身的线框
 |
Grass objects are also rendered as a 2D grid to optimize performance. The Step parameter defines the cell size. Usually, impostors are visible much further than meshes, and the Step value is to be chosen respectively. You can use the Subdivision parameter that subdivides large grass cells so that they match smaller cells of a Mesh Clutter to make positions of randomly scattered objects coincide with positions of grass-based impostors. Therefore, the Clutter Step must match the ratio of Step/Subdivision values of the grass.草地对象也以2D网格的形式渲染以优化性能。Step 参数定义了单元格的大小。通常,替身(impostors)的可见距离比网格远得多,因此需要相应地选择Step 值。您可以使用Subdivision参数将大的草地单元格细分,以使其与Mesh Clutter的较小单元格匹配,从而使随机散布的对象位置与基于草地的替身位置一致。因此,Clutter的Step必须与草地的Step/Subdivision值的比例相匹配。
GrassGrass(草地)#

The Grass object with the grass_base material can fill empty spots on the terrain and increase the overall density of lower vegetation in the scene. The grass_base material is intended to represent the basic features of grass. It has a lower visual fidelity compared to the mesh_base material, so Grass should be thought of as an additional filling layer of grass.带有 grass_base 材质的 Grass(草地) 对象可以填充地形上的空白区域,并增加场景中低矮植被的整体密度。grass_base材质 旨在表现基础的草地特性,其视觉精度比mesh_base材质 低,因此 Grass 应被视为草地的额外填充层。
First, you need to prepare a Diffuse texture with chunks representing small grass tufts:首先,您需要准备一张 Diffuse 纹理,其中包含用于表示小草丛的纹理块:
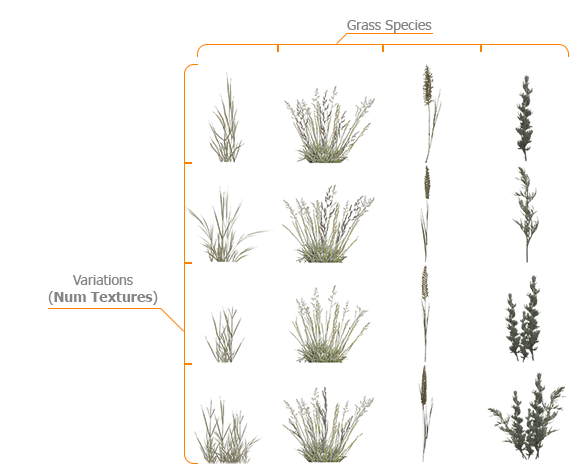
Diffuse Texture for Grass of Various Types各种草地的 Diffuse 纹理Chunks are to be placed in the texture as follows:纹理中的块应按照以下方式排列:
- Columns represent different grass species, each of which will be distributed according to the corresponding channel of the Mask texture. Therefore, the number of columns must match the number of channels of the Mask texture; otherwise, grass tufts will be sliced incorrectly.列代表不同的草种,每种草都会根据 Mask纹理的对应通道进行分布。因此,列数必须与Mask纹理的通道数匹配,否则草丛会被错误地切割。
- Rows represent variations of grass of the particular species (thinner, thicker, tangled, etc.). There can be from 1 to 4 rows, and this number must coincide with the Num Textures value.行代表特定草种的变化(如更细、更粗、缠绕等)。行数可在 1 到 4 之间,且必须与 Num Textures 参数的值一致。
For the grass texture with 4 columns, a mask with 4 channels should be used:对于具有 4 列的草地纹理,应使用带有 4 个通道的蒙版:

RGBA Image Mask for Grass of 4 Various Types用于 4 种不同类型草地的 RGBA 纹理蒙版Refer to the Texture Slots section for more details.有关详细信息,请参阅 Texture Slots 章节。
Visually attractive grass, however, may reduce performance if rendered as a whole. All computations are time-sliced and performed per cell of a 2D grid to allow rendering at interactive frame rates. So choosing the optimal Step for cells is crucial for better performance.虽然高质量的草地视觉效果更吸引人,但如果整体渲染,可能会降低性能。因此,所有计算都采用 时间切片方式,并按 2D 网格的单元 进行处理,以确保交互式帧率的渲染性能。因此,选择合适的 Step 值对于优化性能至关重要。
For more details on creating and configuring grass, refer to the in-depth tutorial: Adding Grass.有关创建和配置草的更多详细信息,请参阅深入教程:添加草地。
Grass: General Recommendations草地:通用建议#
When adding grass in the scene, try to follow these general recommendations to avoid the performance drop:在场景中添加草地时,请遵循以下建议,以避免性能下降:
- Use LODs and simplify the farthest LOD to the maximum extent. The fade distances between LODs shouldn't be very big, because these transitions imply that two objects are displayed simultaneously instead of one, which definitely affects performance.使用 LOD(层级细节) 并尽可能简化最远的 LOD。LOD 之间的淡入淡出距离不应过大,因为 LOD 过渡时会同时显示两个对象,而不是一个,这将影响性能。
- Disable shadows cast by the grass object surface and use screen-space shadows.禁用草地对象表面的阴影投射,并使用 屏幕空间阴影(Screen-Space Shadows)。
- The grass mesh normals should be directed upwards to ensure correct shading.确保草地网格的法线方向朝上,以获得正确的光照效果。
- Make the albedo/roughness of the ground, which is visible in the background, similar to the grass albedo/roughness so that the transition between these two objects in the distance is smooth and natural.使地面(背景可见部分)的 Albedo/Roughness 贴图与草地的 Albedo/Roughness 贴图相匹配,这样在远处,草地与地面的过渡会更加平滑、自然。
See Also也可以看看#
- Generating vegetation based on landcover data using Sandworm使用 Sandworm 根据地表覆盖数据生成植被
- Grass Optimization草地优化
- Vegetation content sampleVegetation 植被内容示例
- Vegetation add-onVegetation 附加组件
- Fox Hole demoFox Hole 演示
本页面上的信息适用于 UNIGINE 2.19 SDK.