Material Editor
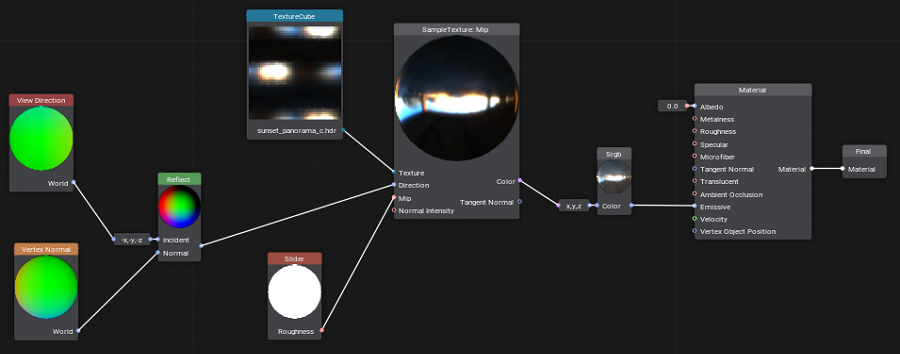
Material Editor enables you to create your own materials visually without writing a single line of code — simply create and connect nodes building a graph! It is simple enough for users who are new to materials creation and powerful enough to let you do a lot of things. A brief list of features includes:
- Ability to create your own base materials (.mgraph) and use them as directly assigned to objects or as parent materials for hundreds of other materials to avoid reassembling the material graph over and over again. The Materials hierarchy window will help you.
- Ability to create your own custom graph nodes using other nodes (Subgraphs), or using your code. When you change the contents of a Subgraph, all materials using it will be updated as well.
- Ability to switch between material types (there are five available at the moment: Mesh Opaque PBR, Mesh Alpha Test PBR, Mesh Transparent PBR, Mesh Transparent Unlit, Decal PBR).
- Optional toggling of performance-affecting features on and off.
- Ability to construct the final material's UI, you can add various parameters and even combine them into groups for convenience.
- Connector — a special 'collapsed' mode of a graph node when it occupies less space and can be attached right to an input of another graph node.
- Expression — a special node enabling you to write simple arithmetic operations, but the main thing is that you can use it as a swizzle in combination with the ability to change the number of data components. Be sure you'll like it!
- Ability to write code in a special Function node, here you can implement even multiple functions calling each other.
- You can drag-n-drop textures from the Asset Browser or directly from your file manager, and they will be automatically imported with the corresponding nodes added to the graph.
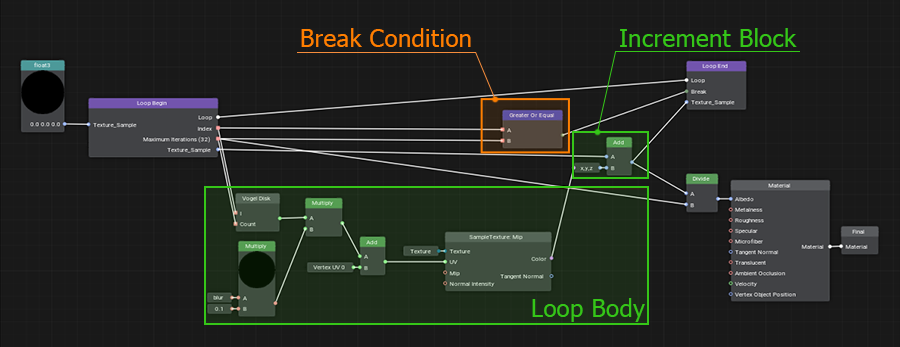
- Loops — a complex, but very cool feature enabling you to repeat an arbitrary sequence of actions multiple times. We have analyzed multiple existing implementations of graph loops and invented a new one that is almost on par with loops in code. Why not write loops in code then? Because using a graph makes implementation of complex things inside a loop much easier than doing the same in code.
- When working with complex or large graphs, you may end up with your wires are all over the place crisscrossing each other and you may want more visual clarity. That's when portals come into play. You can connect a wire to a Portal In node at one location and then place a Portal Out node at any other location you need and take what you've supplied to Portal In from a Portal Out (like you dug a tunnel for your wire under the node graph).
See Also#
Material Graph Asset#
A Material Graph asset (.mgraph) is both a source material network (node-based description to be compiled into a material) and a normal base material that can be assigned to a mesh surface.
To create a new Material Graph, right-click in the Asset Browser to open the Create menu, then select Create Material -> Material Graph.
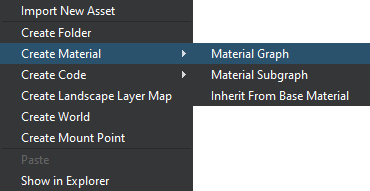
Specify a name for your graph asset. A new *.mgraph asset will be created in the current folder of your project.
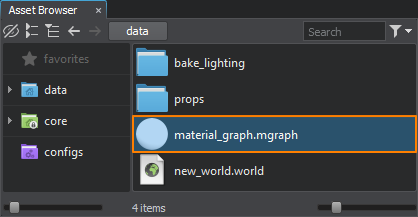
As the Material Graph asset represents a base material, it is also available in the root of the Materials Hierarchy and can be assigned to supported surfaces and objects. Depending on the material's type it can be assigned to the following objects:
-
Mesh materials:
- Surfaces of Static, Dynamic, and Skinned meshes;
- Surfaces of Mesh Clutter / Mesh Cluster.
-
Decal materials:
- Projected, Orthographic, and Mesh decals.
Working with Material Graphs#
Right-click on the *.mgraph asset and choose Edit Graph or simply double-click the asset to open it in the Material Editor window.
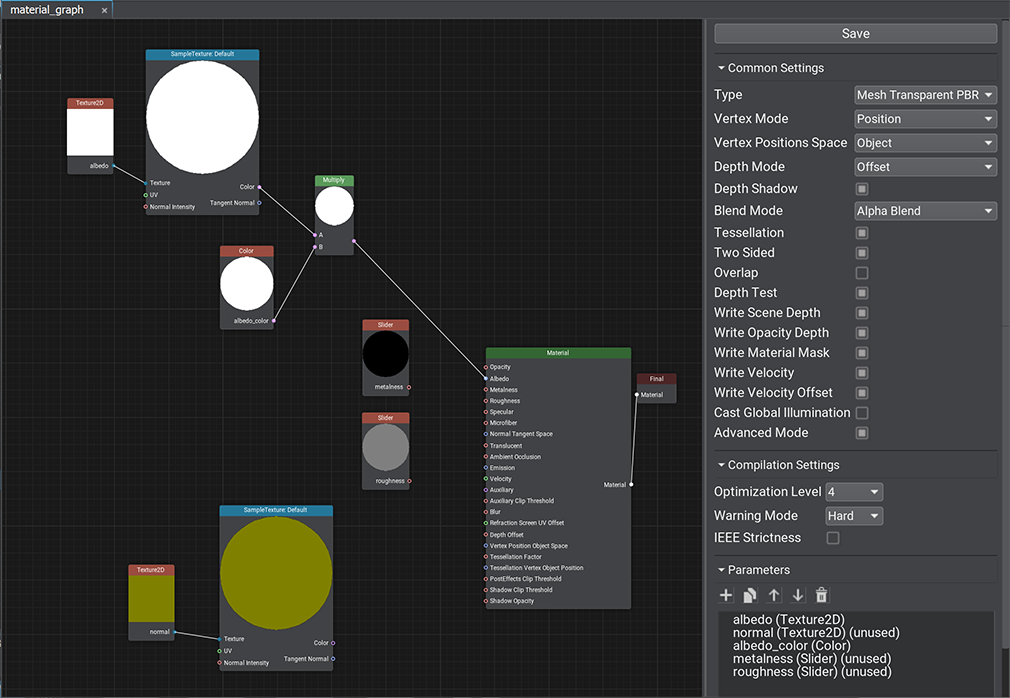
The Material Editor window includes the Graph View displaying the material graph network and the settings panel.
The material graph network consists of nodes — functional blocks accountable for processing input data. By composing the graph network, you define the look of your material.
The Material node is the master node of your material. It provides a set of inputs for graphic data and generates a material of a specific type depending on the current settings.
Finally, the output from the Master Node is connected to the Final node — the primary output material node.
Press the Save button to save changes and compile the material graph to a base material. Compilation errors, if any, will be listed in the Warnings and Errors panel and in the Console window.
Navigation Controls#
| Mouse Wheel drag | Pan material graph |
|---|---|
| Mouse Wheel scroll | Zoom in/out |
| RMB / Space key | Display node creation palette |
| LMB click | Select node / edge |
| LMB drag on background | Select nodes with the rectangle tool |
| Shift + LMB on node | Add to node selection |
| Ctrl + LMB on node | Remove from node selection |
| LMB drag on node | Move the selected nodes |
| Ctrl + C | Copy the selected nodes to the clipboard |
| Ctrl + V | Paste nodes from the clipboard |
| Ctrl + D | Clone the selected nodes |
| Delete Key | Delete the selected nodes / edge |
Common Settings#
The Common Settings define the set of supported features for the material.
| Type | The type of the output material:
|
|---|---|
| Vertex Mode | Defines the mode for vertex adjustment and tessellation inputs:
|
| Vertex Space | Defines the vector space for vertex adjustment and tessellation. Options depend on the Vertex Mode selected:
|
| Normal Space |
Defines the space for normal vectors:
|
| Depth Mode |
Defines how the Depth data is treated:
|
| Depth Shadow | Flag indicating whether custom depth affects shadows. |
| Tessellation | Enables the Tessellation-related inputs and Tessellation settings. |
| Two Sided | Enables the Two Sided option. |
| Write Velocity Offset | Enables writing velocity offset along with displaying related Velocity input for vectors defining screen-space pixel offset. |
| Advanced Mode | Enables the Compilation Settings. |
Transparent Material Settings#
The following settings are available only for the Mesh Transparent PBR and Mesh Transparent Unlit material types.
| Blend Mode |
Blending preset. One of the following can be selected:
|
|---|---|
| Blend Src | Option used to scale the source color (the color of an overlaying material). Available only when Custom preset is selected. |
| Blend Dest | Option used to scale the destination color (the color of an obscured material). Available only when Custom preset is selected. |
| Overlap | Render polygons, to which the material is applied, on the top of the render. This can be used for UI elements. |
| Depth Test | Depth testing for the material. This option can be used to make the object visible, when occluded by other objects (e.g. a character behind a wall). |
| Write Scene Depth | Toggles writing to the depth buffer for the material on and off. With this option enabled the inner part of a transparent object won't be rendered if the outside surface was rendered first. The same can happen to a concave object. |
| Write Opacity Depth | Toggles writing to the opacity depth buffer for the material on and off. |
| Write Material Mask | Toggles writing to the material mask buffer for the material on and off. |
| Write Velocity | Toggles writing to the velocity buffer for the material on and off. |
| Cast Global Illumination | Controls whether the surface is to be taken into account or ignored when baking Global Illumintaion (similar to the per-surface Cast Global Illumination option). Can be used to ignore all transparent surfaces having the same material at once when baking GI, instead of switching them one by one. |
Decal Material Settings#
The following settings are available only for the Decal PBR material types.
| Normal Under Decal |
Defines the tangent space (Tangent-Binormal-Normal matrix) used for normal mapping:
|
|---|---|
| Normal Blend Mode |
Blending mode for decal's normals:
|
| Screen Projection | Enables Screen Projection of the decal instead of projecting it onto a surface (only Mesh decals are supported). |
Post-Effect Material Settings#
The following settings are available only for the Post Effect material types.
| User Mode | Defines the way the stages of the rendering sequence are displayed:
|
|---|---|
| Render Sequence Order | Specifies the stage of the rendering sequence when the material should be rendered. The set of available options depends on the selected User Mode. |
| Textures Streaming Mode | Specifies the streaming mode for the material's textures:
|
| Use TAA | Toggles Temporal Anti-Aliasing for the material on and off. When enabled, the additional settings given below become available. |
| Color Clamping Mode | Specifies the color clamping mode used to reduce the ghosting effect. Available only when the Use TAA option is enabled.
|
| Fix Flicker | Removes bright pixels using the pixel brightness information from the previous frame. It is recommended to enable this option for bright thin ropes, wires, and lines. Available only when the Use TAA option is enabled. |
| Frames By Color | Toggles on and off the accumulation of a variable number of frames over time depending on the pixel color difference between the current and previous frames. When enabled, the image becomes sharper, but it may produce additional flickering. Disabling this option may result in a more noticeable ghosting effect. Available only when the Use TAA option is enabled. |
| Antialiasing In Motion | Toggles improved anti-aliasing in motion (for moving camera and objects) on and off. Available only when the Use TAA option is enabled. |
| Diagonal Neighbors | Toggles on and off the consideration of diagonally neighboring pixels in the process of color clamping. Available only when the Use TAA option is enabled. |
| Catmull Resampling | Toggles the Catmull-Rom resampling on and off. The Catmull-Rom resampling allows you to reduce image blurring when the camera moves forward or backward. It is recommended to disable resampling at low settings. Available only when the Use TAA option is enabled. |
| Frames By Velocity | Toggles on and off the accumulation of a variable number of frames over time depending on the pixel velocity difference between the current and previous frames. Reprojection of pixels from the previous frame is performed considering the velocity buffer, and then the result is combined with the pixels of the current frame. This option reduces blurring and ghosting in dynamic scenes with numerous moving objects. Available only when the Use TAA option is enabled. |
Compilation Settings#
These settings are only for the Direct3D compiler (DirectX API).
| Optimization Level | Level of shader optimization and arithmetic refactoring (such as merging a multiply instruction followed by an add into a fused mad):
|
|---|---|
| Warning Mode |
The following modes are available:
|
| IEEE Strictness | Forces the IEEE strict compile. |
Parameters#
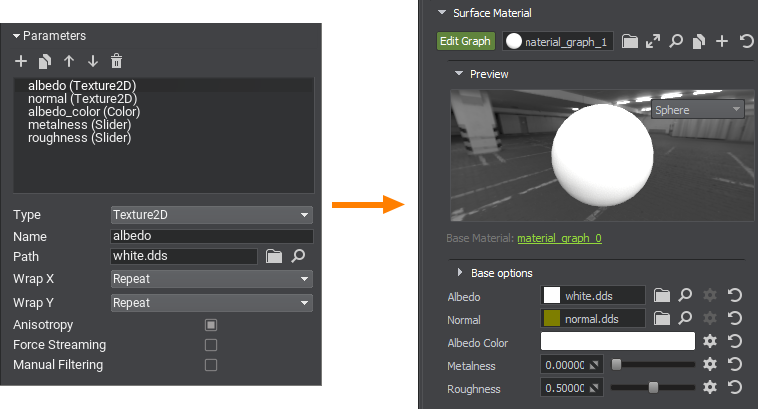
In the Parameters panel, you define the list of material parameters.
The following controls are available:
 Add — add a new parameter.
 Clone — clone the selected parameter.
 Move Up — move the selected parameter up in the list.
 Move Down — move the selected parameter down in the list.
 Remove — remove the selected parameter.
When adding a new parameter, you should specify the parameter's Name, Type, and default settings in the parameter creation dialog. The following set of parameter types is provided:
- Slider — a float value within the specified range ([0.0f; 1.0f] by default).
- Color — a float vector of 4 components representing a color value.
- Texture2D, Texture3D, Texture2DArray, Texture2DInt, TextureCube — a texture of the corresponding type.
- Group — an auxiliary type for grouping parameters. Use the
 and
and  buttons to rearrange and group parameters.
 - Float, Float2, Float3, Float4 — a float value or a vector of N float values.
- Int, Int2, Int3, Int4 — an integer value or a vector of N integer values.
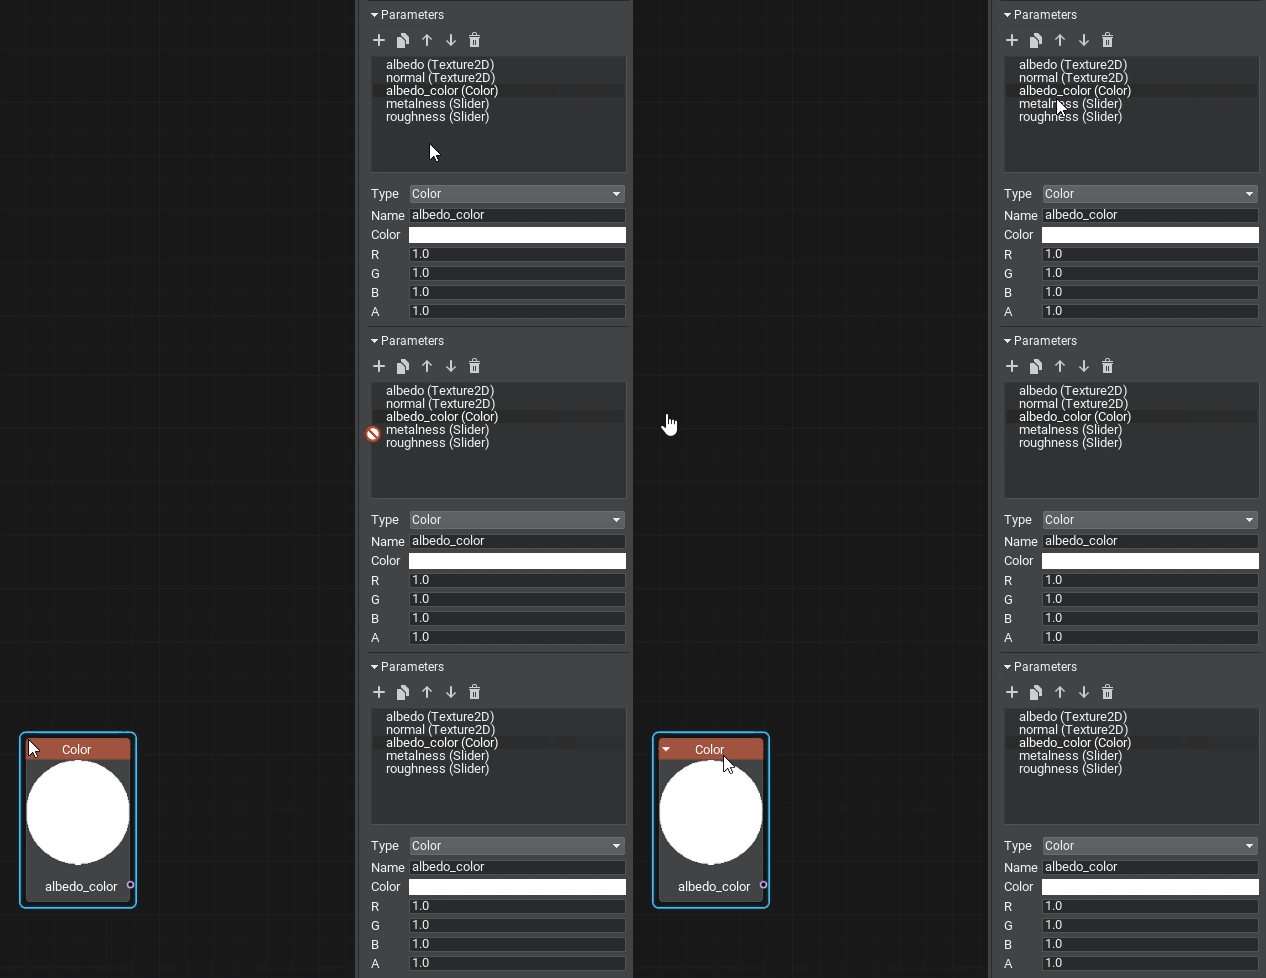
To use a parameter in your material graph, drag the item to the Graph View to create a node of the corresponding type:
Warnings and Errors#
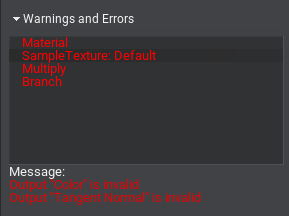
The Warnings and Errors panel enables you to track problems in the material graph and is visible only if there are any.
The panel lists all problem nodes in the graph, select an entry to see the problems with its ports or data in the Message section.
Some warnings may appear after migrating your content to a higher SDK version. These are reminder warnings meant to notify about changes in the logic of certain nodes. You can discard the warning by using the Remove Warning button.
Nodes#
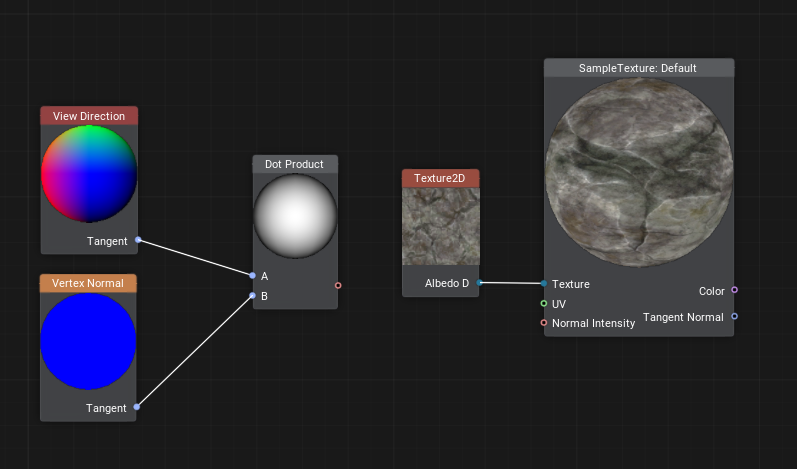
Nodes of Material Editor are functional blocks that represent data sources and processing instructions similar to variables and functions in shader programming.
Most nodes have the output preview shown on a preview sphere (for most nodes) or a plane (for textures).
Some nodes have a set of settings defining their behavior. Double-clicking the node opens the dialog for adjustment of the node's settings.
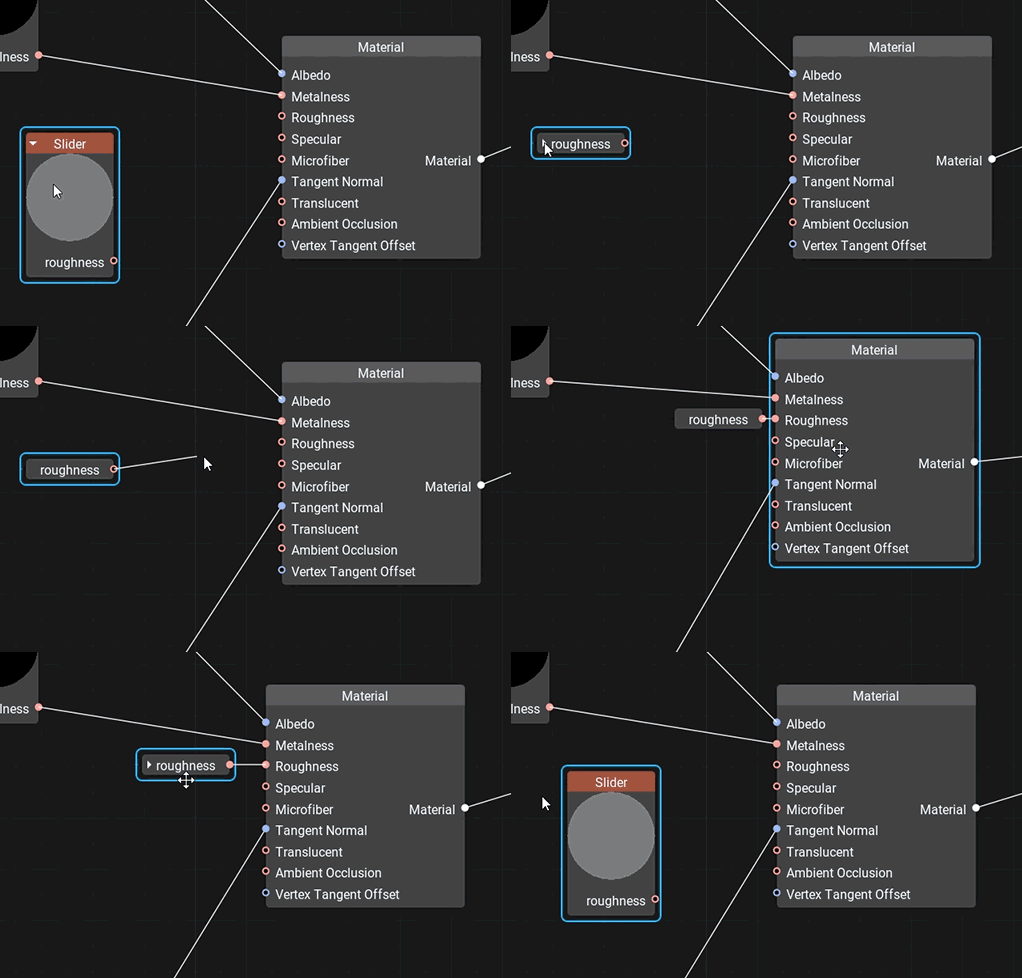
Nodes that have no more than one input and one output port have a special connector mode — they are collapsible for convenience. A collapsed node connected to another node becomes attached to it. Drag the collapsed node to break the connection and detach the node.
Nodes are split into several groups based on their applicability and color-coded for better identification.
Port#
A port defines an input (left side) or output (right side) of a node. Connecting edges to a port allows data to flow through the Material Graph node network.
Each port has a data type defining edges that can be connected to it. All data types are color-coded, meaning that each of them has an associated color used for identification.
 float
float |
 float2
 |
 float3
 |
 float4
 |
 int
int |
 int2
int2 |
 int3
int3 |
 int4
int4 |
 matrix — a matrix of float values: float2×2, float3×3, float4×4.
 |
|||
 texture — any type of a texture: Texture 2D, Texture 3D, Texture 2D Array, Texture 2D Int and Texture Cube.
 |
|||
 bool — a boolean value used in logical nodes and loops.
 |
|||
 any — arbitrary data type meaning the port supports several data types.
 |
|||
 error — indicates an error (e.g., no required input provided or type conversion has failed).
 |
|||
Only one edge can be connected to any input port, but you can connect multiple edges to an output port.
Most input ports have a default input value.
Edge#
An edge represents a connection between two ports (input and output). Edges define how data flows through the Material Graph node network. You can only connect an edge from an output port to an input port.
A new edge is created by dragging from the desired output port to the desired input port or vice versa. To remove an edge select it with the left click and hit Delete.
Port Adapters#
Port adapter is a feature giving you the ability to select data components in an arbitrary order, combine and rearrange them, providing convenient access to elements and a lot of flexibility. It is available for the following data types:
- bool
- float, float2, float3, float4
- int, int2, int3, int4
When you drag a new edge to an input port, a number of available connection options shall appear:
- The = option provides the direct connection in the case the input type can provide all needed data components.
- Selecting another option creates an Expression node accountable for type conversion.
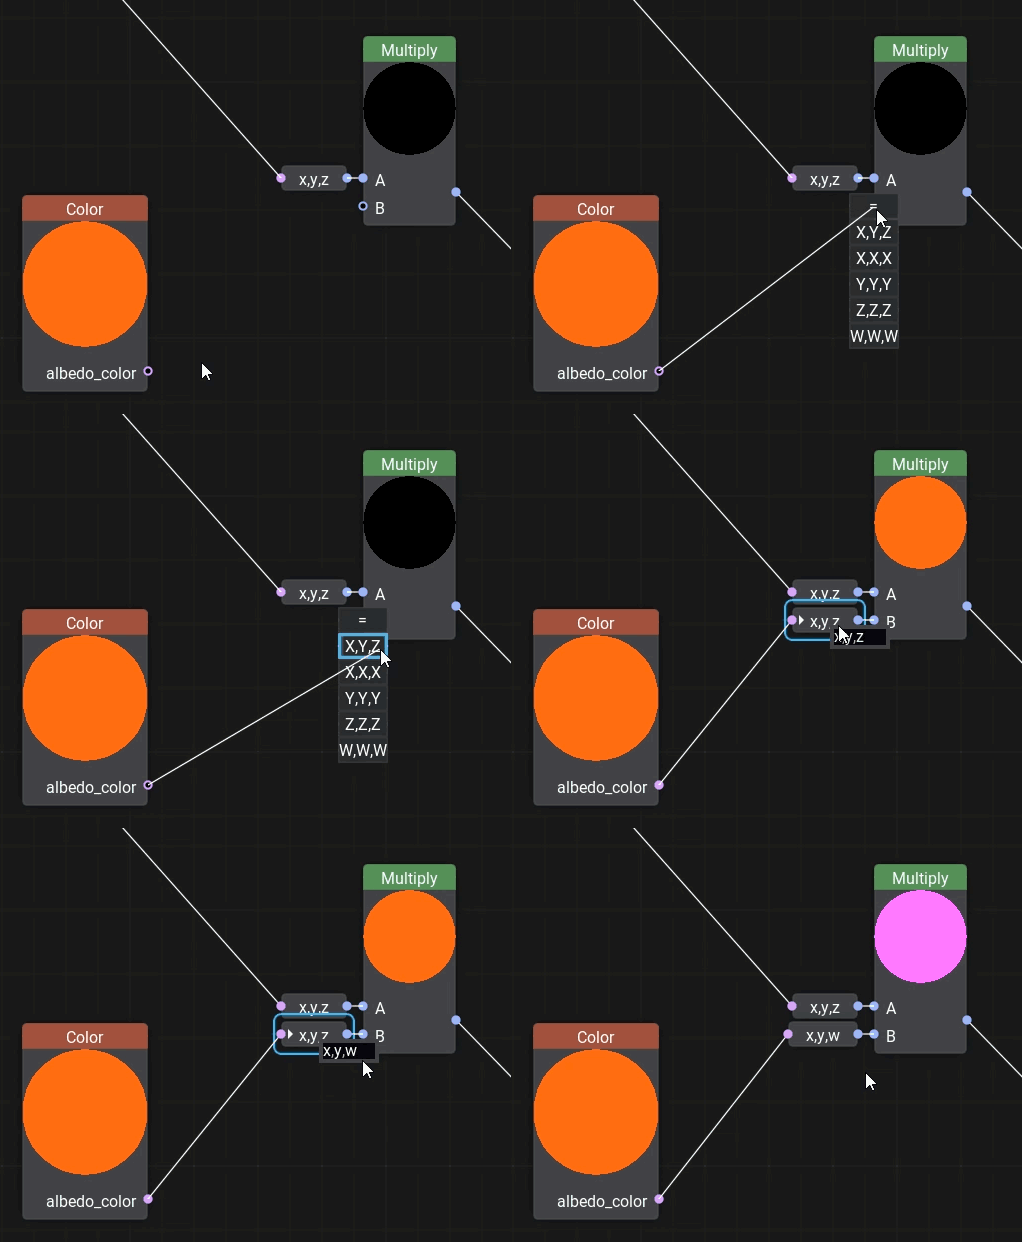
You can change the adapter later by double-clicking the expression and editing the field. The Expression node enables you to write simple arithmetic operations and even use the Unigine Graphic API.
Adding New Nodes#
In order to add a new node, right-click on the background or press Space and select a node type from the palette or type its name in the Search field to find it.
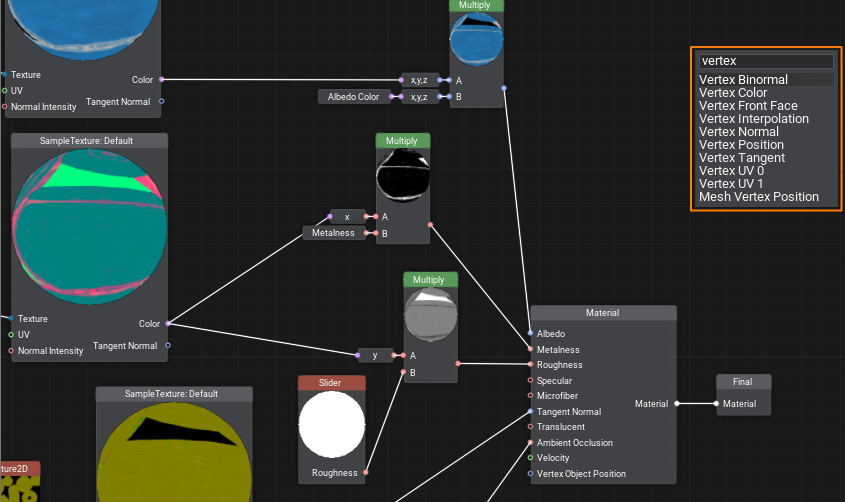
Dragging an edge from an input port opens a node creation palette with a pre-set filter to the required data type for the corresponding port.
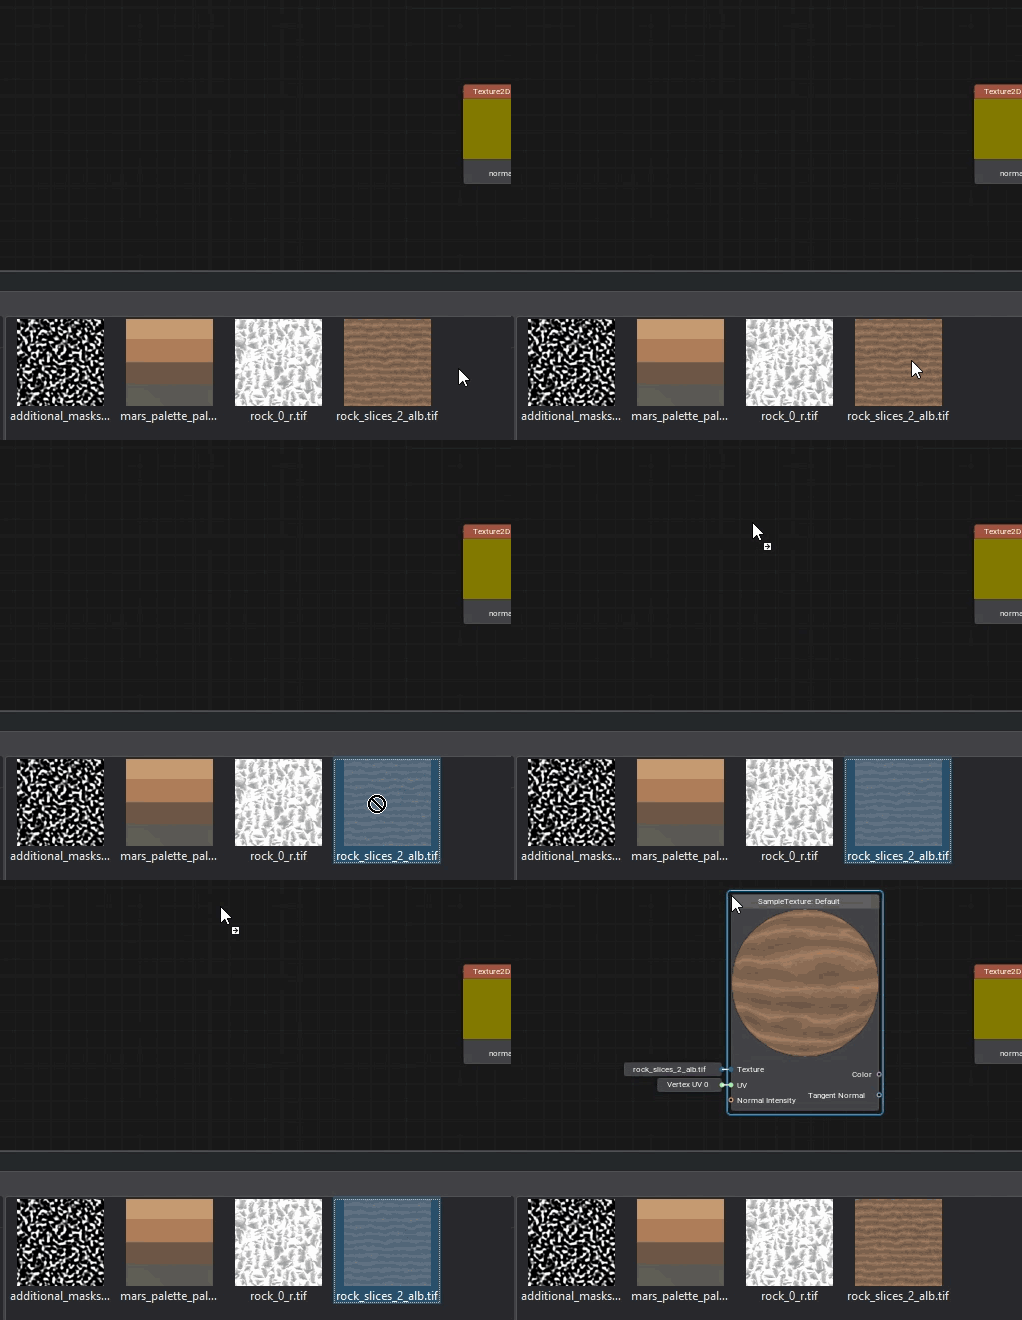
Textures can be dragged directly from the Asset Browser. In this case, a Sample Texture node with corresponding settings will be added automatically.
Loops#
Sometimes you need to perform certain actions multiple times, cloning the relevant groups of nodes will make your graph overcomplicated very quickly, even if only 10 iterations are required. In UNIGINE, you can create loops for that, just like in programming.
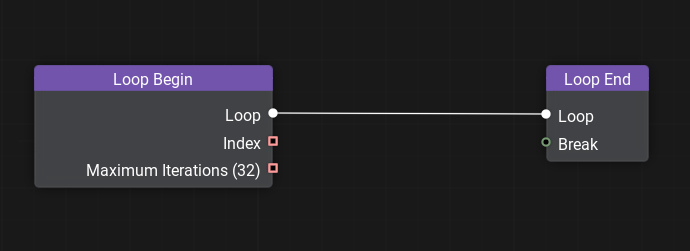
To create a loop, add the Loop Begin and Loop End nodes and connect their Loop ports.
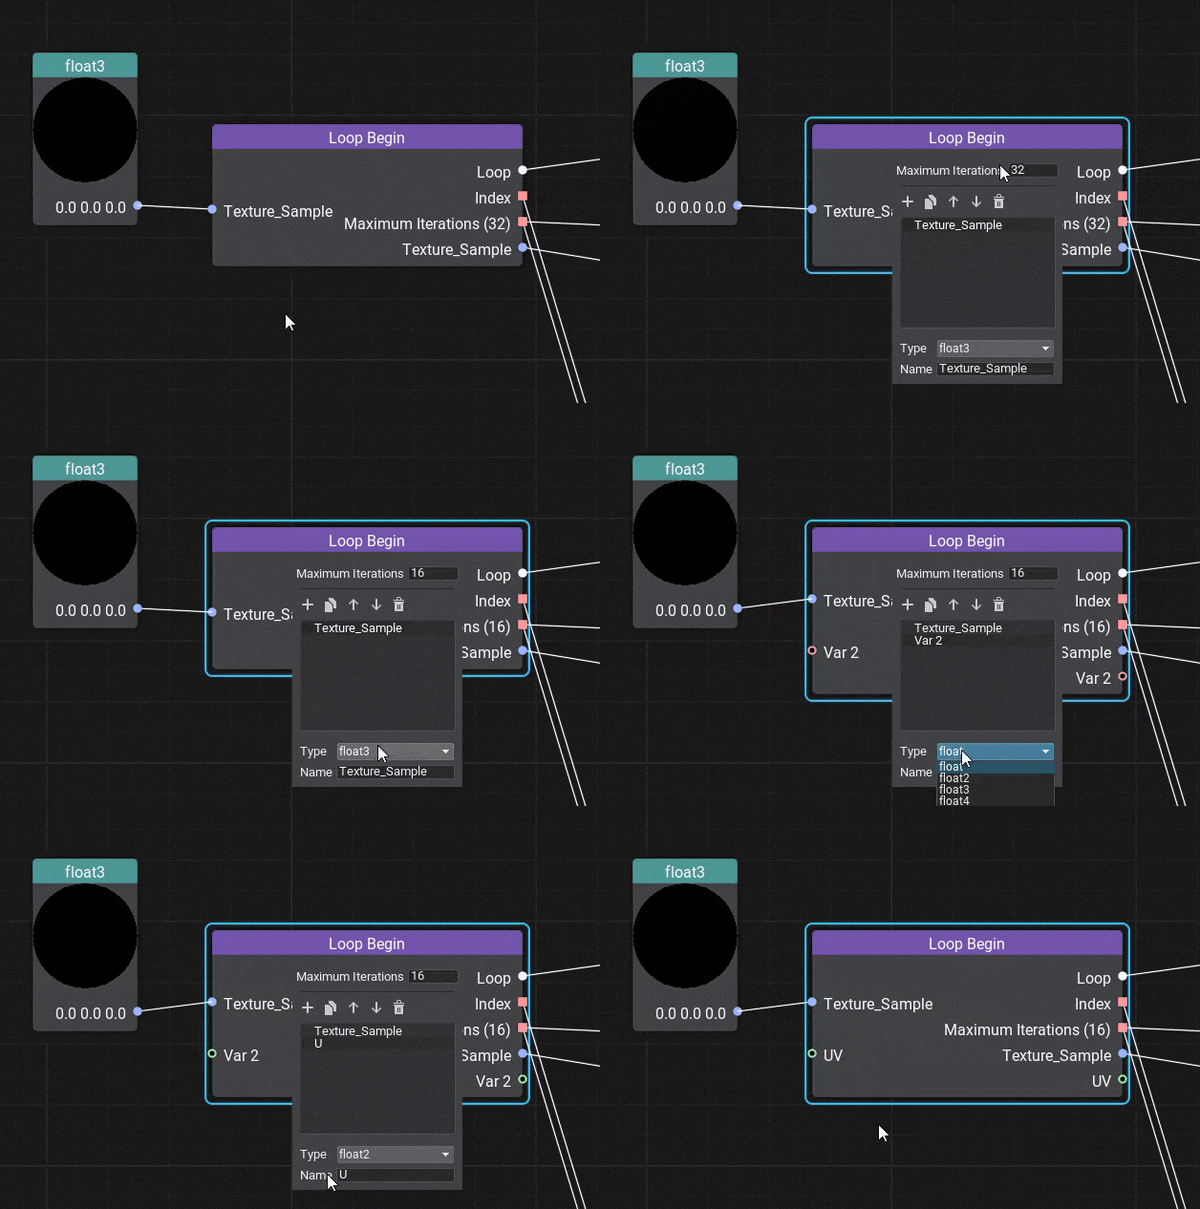
By double-clicking the Loop Begin node, you can open the Input Constructor enabling you to add, rearrange, rename, delete inputs (changing variables or other auxiliary values) and implicitly set their type as well as set the maximum number of iterations.
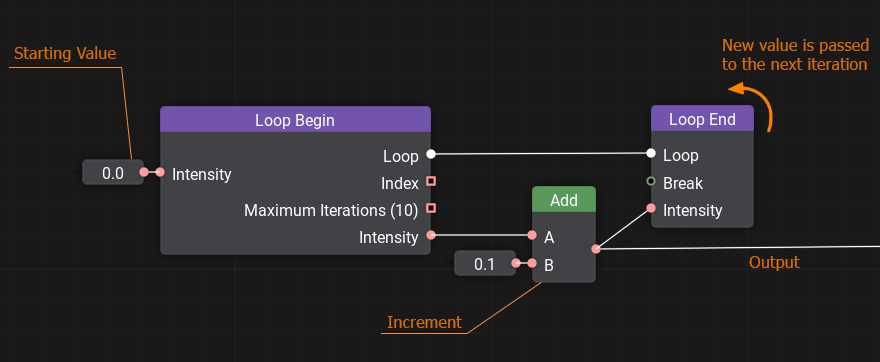
Then, build a graph implementing the functionality of a single iteration, the result of which should be passed to the Loop End node for further iterations. You can use the result of all iterations further in your graph.
You can use the Index of the current iteration and the Maximum Iterations values in your logic. The Index starts with 0 and is equal to Maximum Iterations-1 at the last iteration.
Here's an example of a simple loop, incrementing a value by 0.1 10 times:
The Loop End node has the break input port that takes a boolean value, false by default. Passing a truth value (e.g., obtained via Logical Nodes) will interrupt the loop and exit the current iteration.
Custom Code#
No matter how advanced the materials system is, you might want something specific, maybe too complicated to implement via basic nodes. Or sometimes, it might be quicker to write several lines of code for mathematical operations instead of spawning a bunch of nodes and connecting them. The solution is simple — create a Function node and wrap any shader function into it. Input and output ports for the node shall be automatically generated according to the function's signature.
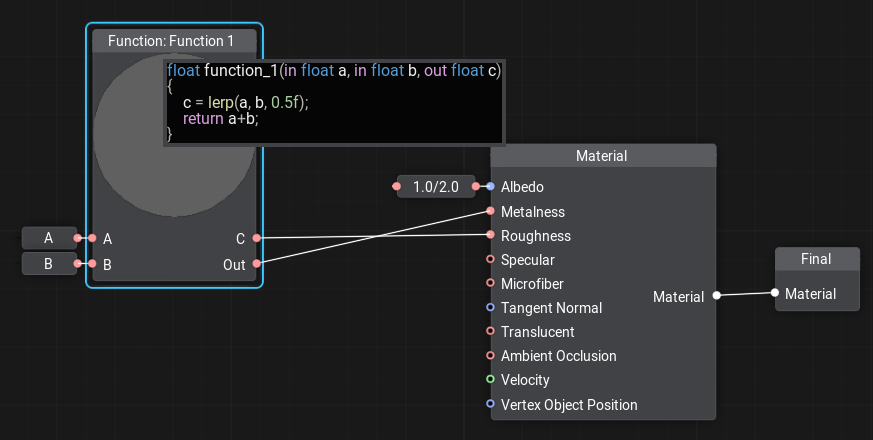
To add or edit code to the node double-click on the node, the Code Editor window will open. You can write as many functions as you need, the last function in the code will be considered the main one.
Portals#
Sometimes, especially in complex material graphs, there are too many crisscrossing edges making the whole graph look like a spiderweb, and the data flow very hard to understand. A portal is a set of special nodes including a single input and one or more outputs, all having the same name. Portals serve to reduce the number of edges and make the graph more 'readable'.
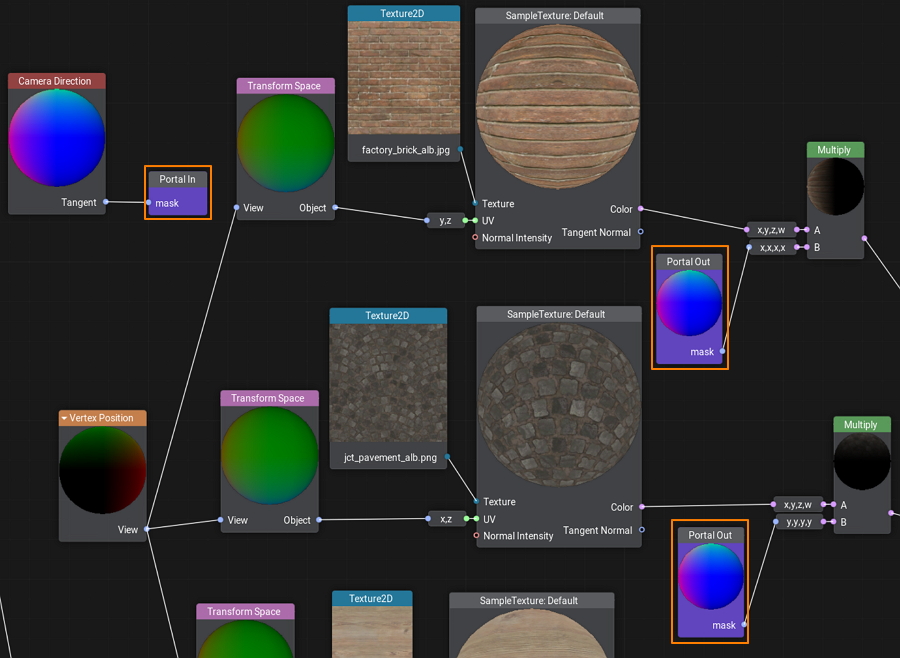
To create a portal, start with adding a Portal In node. Connect an input to the new node and double-click on it to adjust its color and name.
And then you can create as many Portal Out nodes as you need. By double-clicking on a Portal Out node you can select the name of the desired input portal in case several portals are used.
Subgraphs#
A Subgraph is a special type of material graph, which can be referenced from inside other material graphs. This can be very useful when the same operations are to be performed multiple times in a single graph or across multiple graphs. You simply pack these operations into a box with a set of inputs and outputs and then use this box anywhere you need. A Subgraph differs from a Material Graph in three main ways:
- A Subgraph does not generate any material, it is used as a building block in material graphs.
- A Subgraph does not have Material and Final nodes. Instead, it has two nodes called Inputs and Outputs, defining all input and output ports.
- A Subgraph is stored in a *.msubgraph asset.
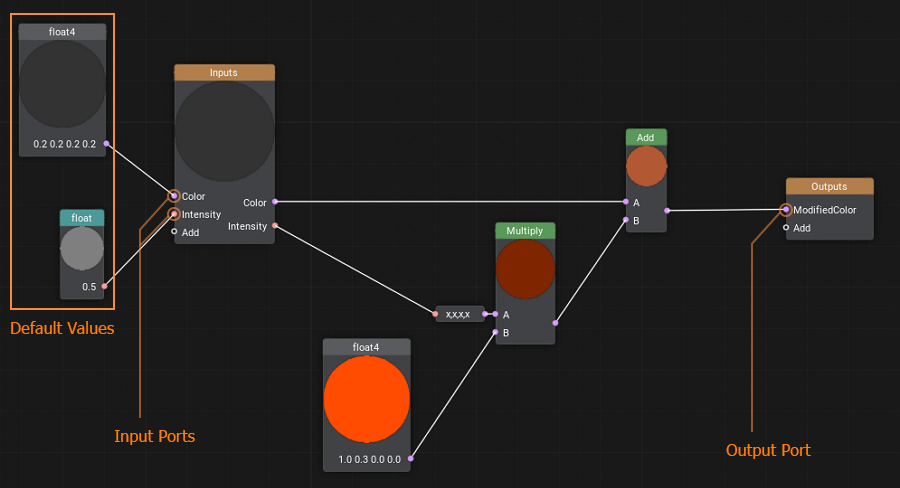
Basically, the process of construction of a Subgraph is the same as when you create a Material Graph.
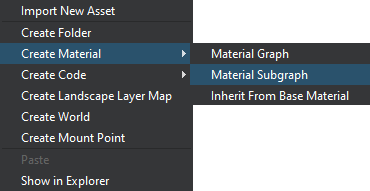
To create a new Subgraph, right-click in the Asset Browser to open the Create menu, then select Create Material -> Material Graph.
Click Save to apply and save changes.
All subgraphs are automatically added to the palette, so if your start typing a name of such a subgraph in the search field of the node creation palette, it will be displayed in the list.
Configuring Inputs and Outputs#
Double click on the Inputs node or the Outputs node to open the constructor panel enabling you to add, rearrange, delete and set the name and type of input and output ports of the subgraph correspondingly.
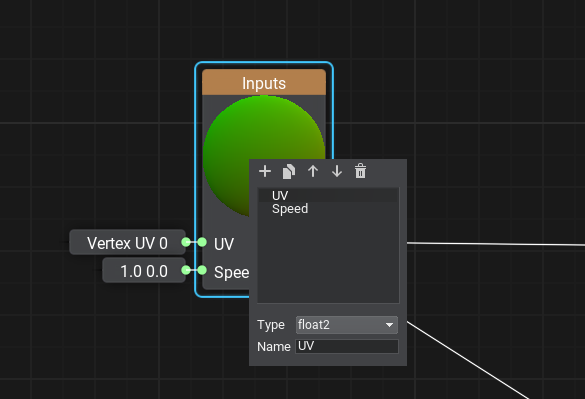
By connecting nodes to the ports of the Inputs node, you specify the optional ports of the subgraph having default values.
Using Subgraphs#
To add a subgraph to your material graph currently opened in the Editor, simply find it by name in the node creation palette or drag it from the Asset Browser, or you can add the Sub Graph node to your graph network, specify the *.msubgraph asset by double-clicking the node, and connect necessary edges to input and output ports of the subgraph.
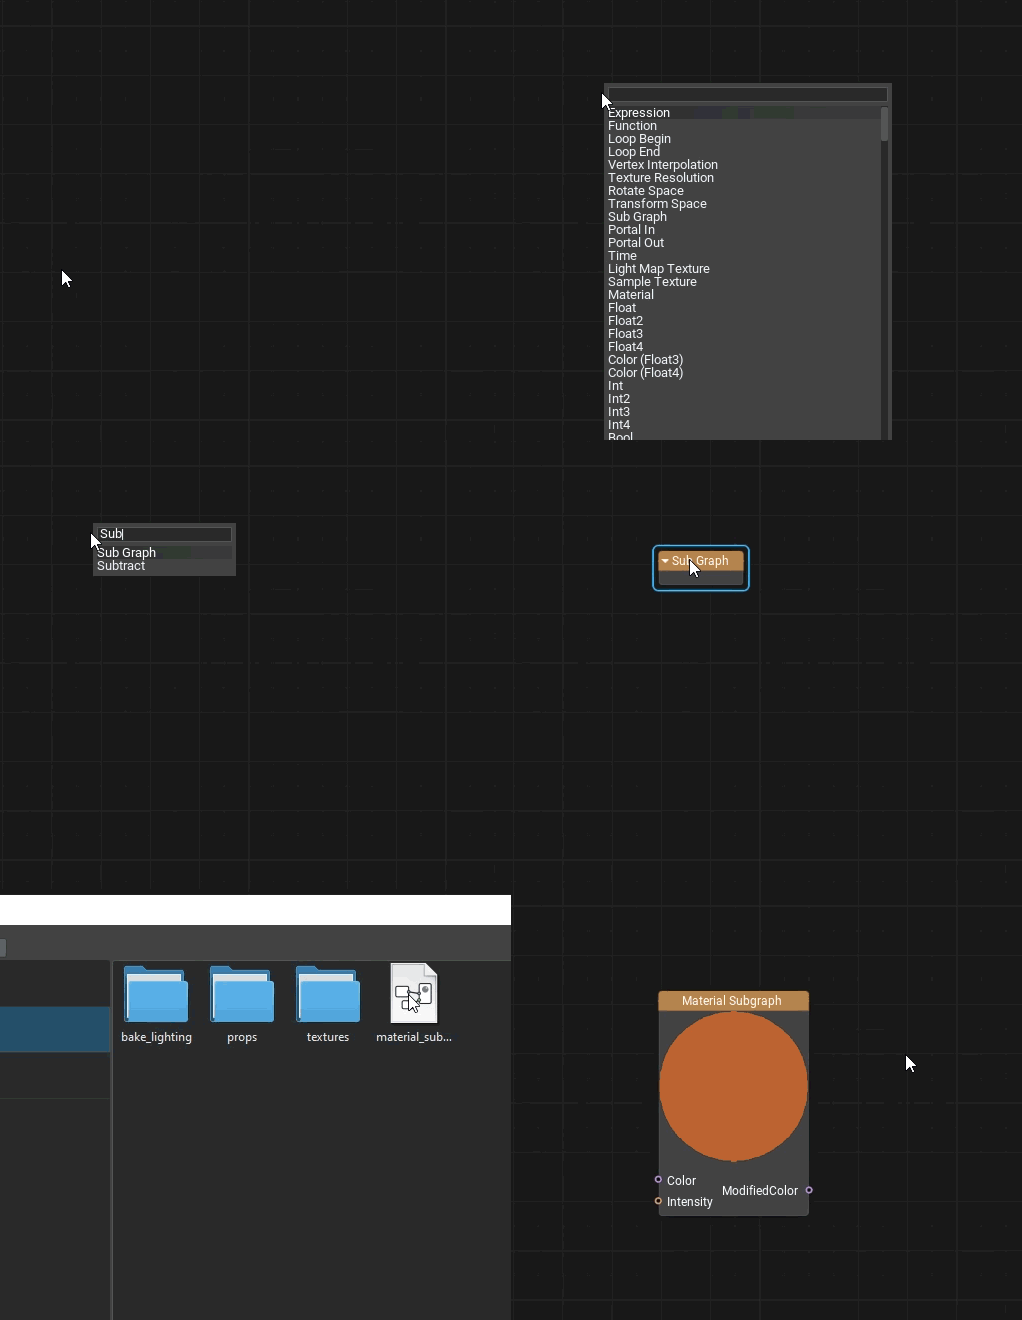
There is a set of core subgraphs implementing basic functionality (like contrast, refract, object_triplanar, etc.) stored in the core/subgraphs folder.
The information on this page is valid for UNIGINE 2.19 SDK.
