Creating Type-Specific Tracks
The type of a track is defined by a parameter that it animates. Each track animates only one parameter. A parameter is a setting of an object, property, material, etc. that should be animated.
The article lists the types of tracks available in the Tracker and gives instructions on how to create a track of a certain type.
Node-Related Tracks#
Node-related tracks allow animating common and type-specific node settings. For example, you can create a track that enables a node, or changes its position. Such tracks need to be bound to some specific node in the world.
Creating a Node-Related Track#
To create a node-related track, perform the following:
- Click
 to add a track that will animate some parameter. The Add Parameter window will open.
 -
Choose a node in the list and then choose a parameter that should be animated and click Ok.
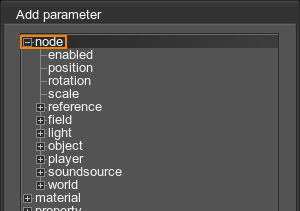
If you want to animate a type-specific node parameter, click + to the left of the desired node type and choose the parameter.
-
In the Select Node dialog window that opens, bind the track to a node from the list and click Ok.
NoticeYou can later change the node bound to the track in the Name field of the Track Info section: double-click the field and choose a node in the list.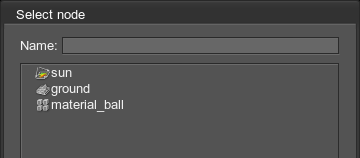 NoticeIf the track animates a type-specific parameter, it should be bound to the node of the corresponding type. Otherwise, an error message will occur.
 - Compose a track by creating the required number of key frames.
Common Node Parameters#
Common parameters of node-related tracks allow you to toggle the node on and off, change its position, orientation and scale along the X, Y, and Z axes.
Moving a Node#
The position parameter allows you to animate node movement along the axes. A spline, along which the node moves, can be visualized in the scene: enable both the track graph and Visualizer (Helpers -> Show Visualizer) in order to see the created track path.
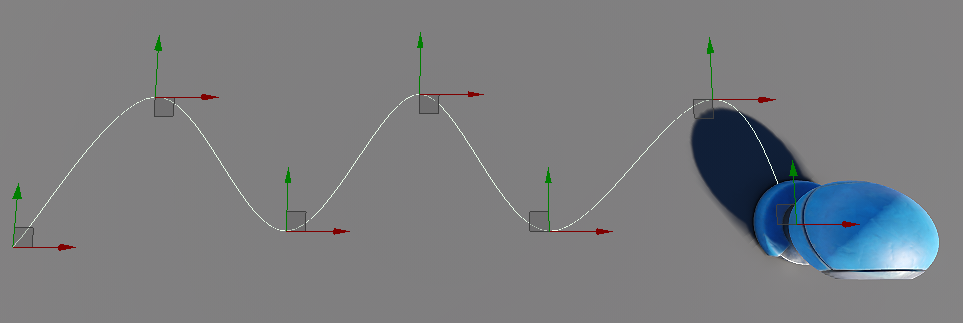
For each axis, you can specify a type of velocity of the node when it moves:
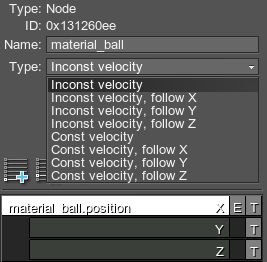
- Inconst velocity stands for the inconstant velocity of the node when it moves along the spline (as curves are passed faster).
- Const velocity stands for the constant velocity of the node. It will move at the uniform speed throughout the whole spline.
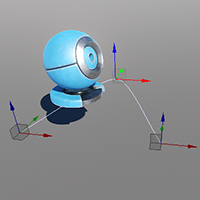
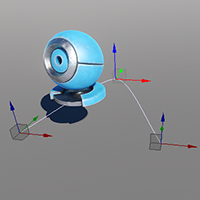
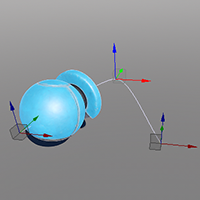
Also, you can specify the axis along which the node should be oriented when moving: choose follow X, Y or Z together with the type of velocity.
 |
 |
 |
Follow X Axis |
Follow Y Axis |
Follow Z Axis |
When you choose the axis to follow, you should also specify an Offset that specifies how far along the spline is the point by which the node is oriented.

- By the default value of 0.01, the node faces the current spline point.
- By higher values, the node is oriented as if it has already moved further forward the spline.
If you want to control the orientation of the node for the follow the axis mode, you can use a dummy node:
- Create a dummy node.
- Add your node as its child.
- Orient and position it relative the dummy however necessary.
Rotating a Node#
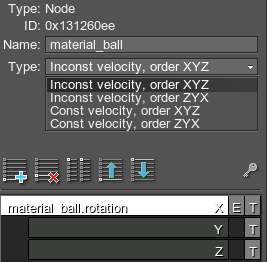
The rotation parameter allows you to rotate the node along X, Y or Z axes. For each axis, you can specify a type of velocity of the node when it rotates:
- Inconst velocity stands for the inconstant velocity of the node when it rotates (with acceleration).
- Const velocity stands for the constant velocity of the node. It will rotate at the uniform speed.
Also, you can specify an order of rotations about the axes: choose order XYZ or order ZYX together with the type of velocity. For example, if rotating the sun (a world light source), the order should be ZYX.
Node Reference Tracks#
These tracks control the name parameter of NodeReferences. This parameter allows you to change the .node file, to which the node reference points. Thus, by using tracks, you can animate switching of the source node of the particular NodeReference.
Fields Tracks#
These tracks control parameters of spacer and animation fields (except the Field and Viewport Masks):
- Field Spacer parameters
- Field Animation parameters
Light Sources Tracks#
These tracks control parameters of light sources:
- Common light parameters
- Omni light parameters
- Projected light parameters
- World light parameters
Objects-Related Tracks#
Objects-related tracks allow animating common and type-specific object settings.
Common Objects Parameters#
Common parameters of objects-related tracks allow you to toggle an object on and off, change a material or a property assigned to a surface of the object. You can also choose a specific parameter of the material or the property to animate.
To change a material or a property set to an object surface, perform the following:
-
- For the material, create the node -> object -> material track.
- For the property, create the node -> object -> property track.
- Choose an object-related node in the Select Node window that opens.
-
In the Surface field of the Track Info section, choose a surface to change the material or property for.
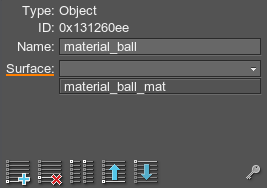
- Double-click the track line to select the material or property to be applied.
Skinned Mesh Parameters#
These parameters allow you to toggle playback of the skinned mesh animation on and off and also set animation from the .anim file.
Particle System Parameters#
These tracks control parameters of particles (and their emitters).
Water Mesh Parameters#
These tracks control parameters of water mesh waves.
Volume Projected Parameters#
These tracks control parameters of volume projected objects.
Player Tracks#
These tracks allow you to set up cameras used for cut-scenes. All types of cameras can be used.
Common parameters that available for all types of players allow you to animate the camera's viewing frustum parameters and post-process materials applied after all other post-processes.
Moving a Camera#
To animate the camera movement, perform the following:
- Add the node -> position track.
- Select the camera you want to move in the Select Node window that opens. The position key frames will be automatically created at the track start based on the current position of the selected player.
- Choose the follow z mode.
- Disable the track and position the target camera.
- Create a snapshot of the current value of the camera position.
- Set the animating camera to be used in-game.
Rotating a Camera#
To animate the camera rotation, perform the following:
- Add the node -> position track.
- Select the camera you want to rotate in the Select Node window that opens. The rotation key frames will be automatically created at the track start based on the current orientation of the selected player.
- Choose the follow z mode.
- Disable the track and rotate the target camera.
- Create a snapshot of the current value of the camera rotation.
- Set the animating camera to be used in-game.
For a persecutor player:
- Add the phiAngle and thetaAngle tracks.
- Select the camera you want to rotate in the Select Node window that opens.
- Disable the tracks and rotate the target camera.
- Create a snapshot of the current value of the camera rotation.
- Set the animating camera to be used in-game.
Player Persecutor Parameters#
A player persecutor has additional settings that can be animated, namely: a target that the persecutor follows, an anchor point, a distance between the persecutor and the target, phi and theta angles.
A position of the persecutor can be controlled in one of two ways:
- By setting the position of the target node (the node position parameter).
- By changing phi and theta angles for the persecutor. This variant is also used to rotate the persecutor.
A player persecutor allows following a node with a camera:
- Add the node -> player -> persecutor -> target track.
- Select the player persecutor node in the Select Node window that opens.
- Double-click the track line. In the dialog window that opens, choose a node that this player will follow.
-
By default, the camera will focus on the center of coordinates of the node. You can change the point of focus:
- Add the node -> player -> persecutor -> anchor track.
- Double-click the track line to set anchor values: they change coordinates of the point of focus by X, Y and Z axes.
-
Adjust the distance between the node and the persecutor. For that, add the node -> player -> persecutor -> distance track.
NoticeThe distance can only be within Min - Max distance range set for the persecutor. - Set the camera to be used in-game.
Sound Source Tracks#
These tracks control parameters of sound sources. For common sound parameters, see the chapter on Sound-Related Tracks.
Switching a Sound Source#
To play a sound from a positional sound source:
- Add node -> soundsource -> play track.
- Choose a sound source.
- Double-click the track line to start or stop playback of the sound source.
World Transform Path Tracks#
These tracks allow you to control playback of the transformation defined by the path: continue the playback if it is paused, or start it if stopped.
Material-Related Tracks#
Material-related tracks allow you to change some material setting over time. Options, states, textures, and parameters of the material can be animated. Such tracks need to be bound to some specific user material.
Creating a Material-Related Track#
To create a material-related track, perform the following:
- Click
 to add a track that will animate some parameter. The Add Parameter window will open.
-
Choose a material in the list and then choose a parameter that should be animated:
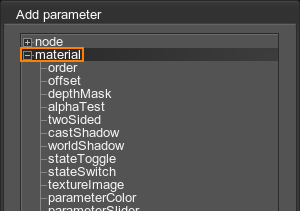
- If the parameter is one of the common material settings, you can add it straight away and go to the next step.
-
If the track should animate a state, texture, or parameter of the material, check the type of the target parameter and choose it in the list:
- For a material state with a checkbox, select stateToggle.
- For a material state with a drop-down list, select stateSwitch.
- For a material parameter with a slider, select parameterSlider.
- For a parameter with a color picker, select parameterColor.
- For a material texture, select textureImage.
-
In the Select Material dialog window that opens, bind the track to a user material from the list and click Ok.
NoticeYou can later change the material bound to the track in the Name field of the Track Info section: double-click the field and choose a material in the list.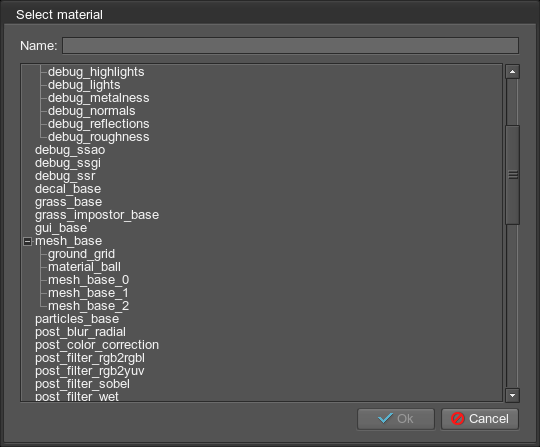
-
If the track animates a state, texture, or parameter of the material, specify its name in the State, Texture, or Parameter field of the Track Info section.
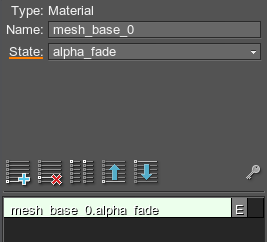 Track Info with State Field
 -
Compose a track by creating the required number of key frames:
- For one of the common material settings or stateToggle, double-click enables and disables the setting.
For stateSwitch:
- For parameterSlider, set the Value.
- For parameterColor, pick a color.
- For textureImage, choose a file.
Property-Related Tracks#
Property-related tracks allow you to change some property setting over time. Options, states, and parameters of a property can be animated. Such tracks need to be bound to some specific user property.
Creating a Property-Related Track#
To create a property-related track, perform the following:
- Click
 to add a track that will animate some parameter. The Add Parameter window will open.
Choose a property in the list and then choose a parameter that should be animated:
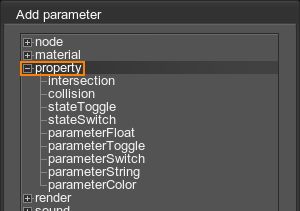
If the track should animate a parameter of the property, check the type of the target parameter and choose it from the list:
- For a parameter with a checkbox, select parameterToggle.
- For a parameter with a drop-down list, select parameterSwitch.
- For a parameter with a slider, select parameterFloat.
- For a parameter with a text string, select parameterString.
- For a parameter with a color picker, select parameterColor.
-
In the Select Property dialog window that opens, bind the track to a user property from the list and click Ok.
NoticeYou can later change the property bound to the track in the Name field of the Track Info section: double-click the field and choose a property in the list.
-
If the track animates a state or a parameter of the property, specify its name in the State, or Parameter field of the Track Info section.
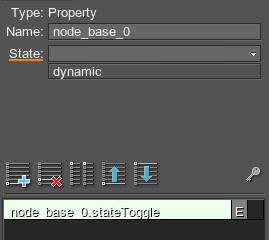 Track Info with State Field
 - Compose a track by creating the required number of key frames:
- For intersection, collision, stateToggle or parameterToggle, double-click to enable and disable the setting.
-
For stateSwitch or parameterSwitch:
- For parameterFloat, set the Value.
- For parameterString, set a string.
- For parameterColor, pick a color.
Render-Related Tracks#
These tracks control render settings:
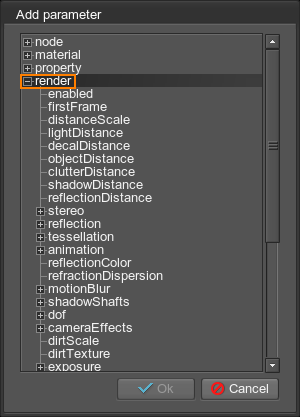
- Common settings.
- Refraction dispersion for red, green, and blue channels.
- Stems and leaves animation settings.
- Amount of motion blur for moving physical bodies.
- Scene environment settings for each preset.
- Glare and specific camera effects such as exposure, tone mapping, bloom, cross flares, lens flares.
- DOF settings.
- Color correction settings.
Render settings are applied to the screen image (i.e. all cameras both in the UnigineEditor and in the game).
Also, a render-related track allows you to toggle rendering into the screen buffer on and off by using the enabled parameter, or to create smooth fade-in and fade-out effects by using the fadeColor parameter.
Creating Fade-In and Fade-Out Effects#
To add fade-in or fade-out effects:
- Add a render -> fadeColor track.
- A key frame with 0 alpha will be automatically created.
- Double-click the created key. This color has 0 alpha value channel, which means it is absolutely transparent.
- Set alpha (A slider) to 255 to create a solid color (for example, black) and click Ok.
- Double-click the track line to create another key frame. This color should have 0 alpha.
Key frame colors are smoothly interpolated from solid color to completely transparent one (revealing a screen image).
- To create a fade-in effect, position a solid color key first and after that a transparent key frame.
- To create a fade-out effect, position a transparent key frame first and after that a solid color key.
Sound-Related Tracks#
These tracks control global sound settings that can be changed in the Sound section of the Settings window. The tracks also allow you to enable or disable the sounds in the scene and change its time scale. To create tracks for individual sound sources, use sound source parameters.
Creating a Sound-Related Track#
To create a sound-related track, perform the following:
- Click
 to add a track that will animate some parameter. The Add Parameter window will open.
 -
Choose a sound in the list and then choose a parameter that should be animated:
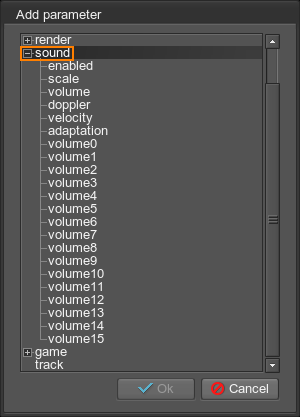
For example, to create a track that controls the volume of all sounds played in the world, choose the volume parameter. To switch on and off all sounds, choose the enable parameter.
Game-Related Tracks#
These tracks can be used to create and edit cut-scenes: switching between cameras, adding and changing postprocess effects.
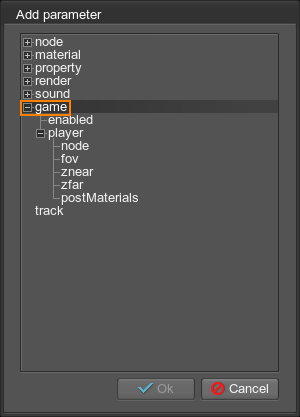
The common enabled parameter allows you to toggle the in-game camera on and off. The other parameters allow you to control the current in-game camera: choose a player used to render the screen image (the node parameter), change the FOV and the distance to the near/far clipping plane of the current player, animate postprocess materials.
Switching Between Cameras#
To switch between the cameras that view the world in the game mode:
- Add the game -> player -> node track.
- Double-click the track line to set the player to render the screen at the given time.
- Choose one of the players on the list.
Changing Camera Settings#
To set up players (change the field of view of cameras or their clipping plane distances), you can use one of the following ways:
- Set up in-game player parameters. That is, they will be applied to the camera currently used in the game.
- Set up player node parameters. These parameters control settings for each separate camera existing in the world.
Applying Postprocesses#
To apply postprocesses, you can choose one of the following ways:
- Add postprocesses for in-game player (the game -> player -> postMaterials track). When cameras are switched, the postprocess will still be applied to the current in-game camera.
- Add postprocesses via the render settings (the render -> postMaterials track). They are applied to the screen image (all cameras) and can be used together with players postprocess materials.
Track-Based Track#
These tracks allow for convenient mixing between different complex tracks (i.e. saved *.track files with a number of tracks inside).
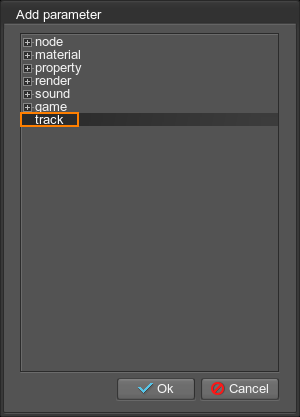
For example, if there are saved tracks files that control day-night shift and tracks that contain weather conditions (windy, cloudy and rainy weather, loading them as track tracks allow you to set the day time while controlling the amount of wind, rain, and cloudiness.
Mixing Different Tracks#
- Add the track track.
- Double-click the track line to create a key frame.
- Choose a *.track file to load.
-
Adjust the Time line of the track:
- Double-click the Time line to create a key frame and set Time = 0 and Value = 0, so that all tracks will be played from the beginning.
- Create another key frame on the Time line with Time = 20 and Value = 20. Thus on the 20th time unit of the track, all internal tracks will also be at their 20th time unit.
- Add another track track, load a *.track file for it and adjust the Time line as described above.
-
Adjust the Weight line of both tracks to specify when the first track is to be played and when the second track: double-click the Weight line to add its weight.
NoticeTo create, for example, smooth transition between tracks, use weights to indicate when the track is played and when it is stopped.
The information on this page is valid for UNIGINE 2.19 SDK.